Customizing brushes to suit you
With the onset of Procreate 5.4, we have 180 new brushes for you to play with in the Procreate Library. Combined with the Classic Library there are close to 400 default brushes in Procreate.
This article contains some tips from Kyle T. Webster about how to make the most of the new brushes, and how to customize them to suit your artistic style.
Heads Up
This article requires you to be using Procreate with an Apple Pencil (1st Generation), Apple Pencil (2nd Generation), or Apple Pencil Pro. If you're unsure if your iPad can use one of these, peek at this Apple article .
Setting up
The first step before customizing a brush is to duplicate it or create a reset point. Duplicating is a good idea if you’d like to have multiple copies of a brush that all behave slightly differently. Creating a reset point on a brush is good for creating a baseline version of it before making changes.
Duplicate a brush
To duplicate a brush, swipe left on it in the Brushes interface and tap Duplicate, or tap and hold on it and select Duplicate from the menu that appears. In this demo, Kyle duplicates a brush and jumps into Brush Studio to make some changes to the copy, while keeping the original brush separate:
Make a reset point
To set a new reset point for a brush, tap twice on it to open up Brush Studio, then head to About this Brush down the bottom of the tabs on the left. From here, tap Create new reset point.
Pro Tip
If you intend to get very experimental, you can duplicate whole brush sets and brush libraries, too - just tap and hold on one and select Duplicate from the list that appears.
Reset Pressure & Smoothing
In order to ensure that we're working with a level baseline, let's remove some variables. Head to Actions → Prefs → Pressure & Smoothing. Scroll to the bottom of this window and tap Reset All and confirm this in the dialog that appears.
Heads Up
This will reset your global pressure and stabilization settings, perhaps avoid this step if you have spent time setting up these preferences.
Customizing brush pressure
In Procreate 5.4, each brush can have its own pressure setting. Almost all of the brushes are designed to react with the pressure of Apple Pencil input, and some produce quite different effects when working at low or high pressure.
To change the pressure curve of a brush, tap on Paint, Smudge or Erase to select the tool, then tap it again to open up Brushes. Tap on a brush to select it, and tap again to enter ' Brush Studio ' for that particular brush.
Once you're in Brush Studio, tap on the 'Apple Pencil' tab on the left, and you'll be presented with the pressure graph immediately to the right. Tap on the graph to add a node, and drag the node to change its position.
In the below video, Kyle draws a stroke with the brush, then raises its pressure curve ramp. This has an immediate effect on the size and flow of the brush, due to their high 'Pressure' values which you'll see below the graph:
In the next video Kyle reduces the pressure ramp of the brush, which again drops the size and flow of the stroke he's already laid down. After this, he slowly demonstrates further adjustments to the curve, then resets the graph to create a perfectly linear ramp of pressure → effect:
You can add nodes up to a maximum of six, and you can tap on a node to bring up a menu allowing you to Delete that node or Reset the whole graph to a linear state from bottom left to top right.
Pressure graph explainer
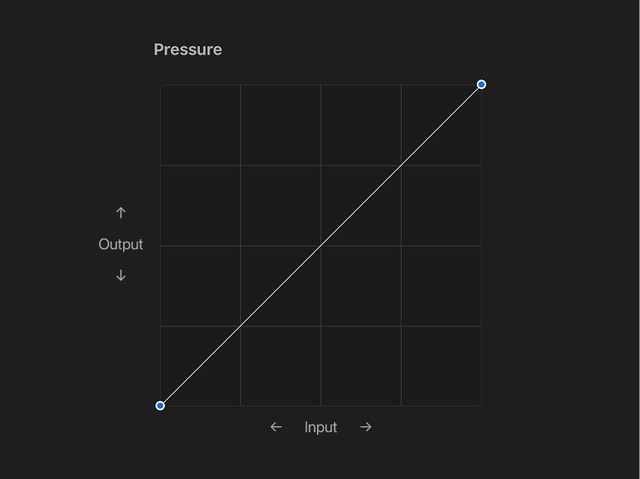
This graph will adjust all pressure-based input for the brush. Any parameter's slider or graph associated with pressure will be impacted primarily by this graph before their effects take place.
The horizontal axis on the pressure graph represents the amount of pressure input from the Apple Pencil, from 0% pressure on the left to 100% pressure on the right.
The vertical axis on the pressure graph represents the effect of pressure, from 0% effect on the bottom to 100% effect at the top.
Barrel roll and Azimuth - how to use them effectively
Many of the brushes in Procreate make use of barrel roll and azimuth. They are often used to dictate the orientation of brush stamps as they are laid down across the path of your stroke.
If you are using Apple Pencil Pro with a compatible iPad, you can use barrel roll to change the orientation of your brush by setting the 'Input Style' in the Shape tab of Brush Studio to 'Azimuth and barrel roll'.
Pro Tip
Turn on 'Relative to Stroke' to have the barrel roll orientation use the initial direction of your stroke to set its rotation start point. Keep this off to have the rotation start point consistent between strokes.
Input style - barrel roll
Using barrel roll, you can twist the pencil to change the orientation of your brush stamps. Check out this demo from Kyle. He is holding the pencil upright to showcase the behaviour, but you can of course twist the pencil when it's angled, too:
Input style - Azimuth
If you don't have a pencil pro with barrel roll, you can still use Azimuth to help change the orientation of your brush stamps as you make your mark.
Set the Input style to Azimuth if you want the orientation of your pencil itself (as you make the mark on the canvas) to change the direction of your brush stamps as you make the stroke. In the video below, Kyle demonstrates using Azimuth specifically to produce a similar result with the same brush:
When you open Brush Studio, you'll see the default orientation of your brush's stamps in the Shape tab. If your Apple Pencil is aimed upwards, towards the (original) top of your canvas, the shape stamps will appear on the canvas in that same orientation.
If you were to turn your Apple Pencil 90º clockwise and make a mark, Azimuth input will cause the brush stamps to turn 90º clockwise, and so on and so forth.
Pro Tip
If you aren't able to use Azimuth or barrel roll due to hardware limitations, you can still set a brush's shape stamps to follow the direction of your stroke itself. To do this, head to the Shape tab in Brush Studio and drag the 'Rotation' slider all the way to the far right until it reads 'Follow Stroke'. This way you can use the path of the stroke to set the rotation of the stamp.
If you would like to deep dive on some more of the settings in Brush Studio, check out this section of the Handbook . Also, take a peek at the Brush Studio section of our Learn to Procreate YouTube playlist .
Sorry. We’re having trouble copying to your clipboard.
Try directly copying the link below.