Animating motion with keyframes
With Procreate Dreams you can animate your content without manual frame-by-frame animation. Add motion keyframes from the Action menu to move, scale, warp or distort your content. Procreate Dreams will automatically animate between each keyframe; this is known as tweening.
To begin, you’ll need some content on a track in your Timeline. Learn how to add content to the Timeline .
Animate content from one position to another


Once you’ve added some content to your Timeline follow these steps:
Move the Playhead over your content on the Timeline to select it. This also sets the time when you’d like your animation to begin.
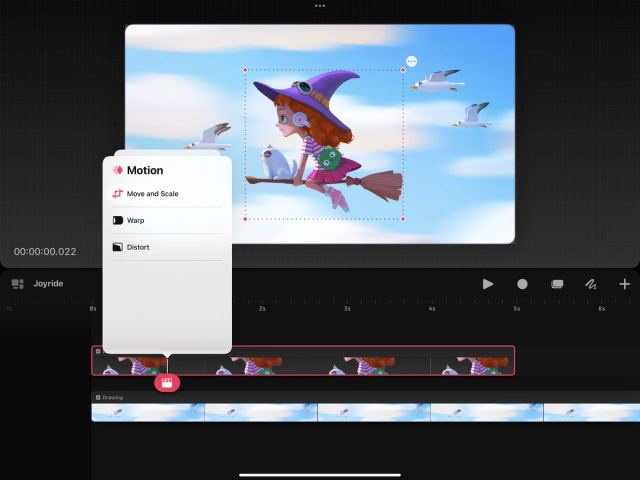
Tap the Playhead to open the Action menu.
Tap Move → Move and Scale
Move your content by dragging it on the Stage to its starting position.
A Move & Scale keyframe will be displayed in a keyframe track underneath your content on the Timeline.
Move the Playhead along your content on the Timeline to the time where you’d like your animation to finish.
Tap the Playhead to open the Action menu.
Tap Move → Move and Scale again.
On the Stage, move your content by dragging it to the position you’d like it to animate to.
Your content will now have an additional keyframe in the keyframe track below it on the Timeline.
Tap play or scrub the Playhead along the Timeline to view the animation.
Pro Tip
You can edit a keyframe by tapping it. This allows you to tweak and update its position if you didn’t get it right the first time.
Animate warping and distortion
To create an animation of content changing shape, follow these steps:
Move the Playhead over your content on the Timeline to select it. This also sets the time where you’d like your animation to begin.


Tap the Playhead to open the Action menu.
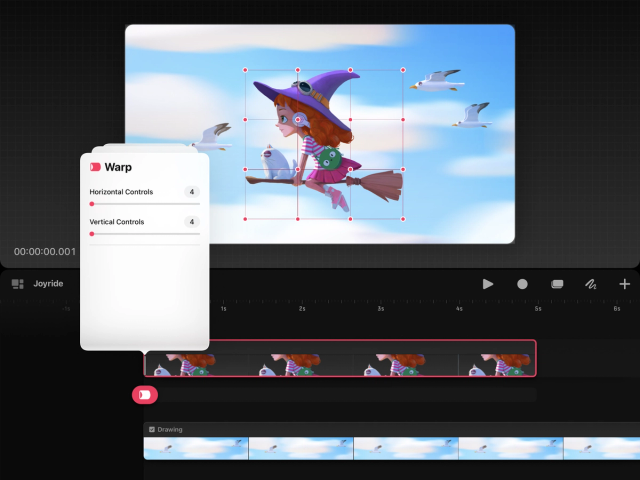
Tap Move → Warp . A warp mesh will appear around your content on the Stage.
Adjust your content’s shape on the Stage using the warp mesh. This will be the initial shape of your content when the animation starts.
A Warp keyframe will be displayed in a keyframe track underneath your content on the Timeline.
Move the Playhead along your content on the Timeline to the time where you’d like your animation to finish.
Tap the Playhead to open the Action menu.
Tap Move → Warp again.
On the Stage, adjust your content’s shape using the warp mesh. This will be the finishing shape of your animation.
Your content will now have an additional keyframe in the keyframe track below it on the Timeline.
Tap play or scrub the Playhead along the Timeline to view the animation.
Heads Up
The Warp Horizontal and Vertical Controls on a content track can’t be adjusted after they have been set and keyframes added to that track.
You can add as many keyframes as you like. Make your content animate through multiple different states, moving and changing shape at the same time.
Sorry. We’re having trouble copying to your clipboard.
Try directly copying the link below.