Dreams Handbook
Sorry. We’re having trouble copying to your clipboard.
Try directly copying the link below.
Keyframes
Keyframes enable an action to occur between two points in time on your content. Keyframes in Procreate Dreams are a flexible and simple way to animate without needing to draw frame-by-frame. In animation, this is known as tweening, the process of automatically creating the ‘in-between’ animation frames between two keyframes. You can use different types of keyframes to create movement and add effects to your content.
Keyframe basics
Use the Playhead to set where on your content you would like to add a keyframe. Tap the Playhead to open the menu.
Tap Move to add motion, warp, or distort keyframes. Tap Filter to add opacity, gaussian blur, sharpen, noise, or HSB keyframes.
Each keyframe will appear on a keyframe track under its associated content. Tap an individual keyframe to view its parameters.
The content track shows you a preview of what effect a keyframe is having on your content at that moment in time.
A bounding box will appear around the content currently selected by the Playhead .
Animating with keyframes
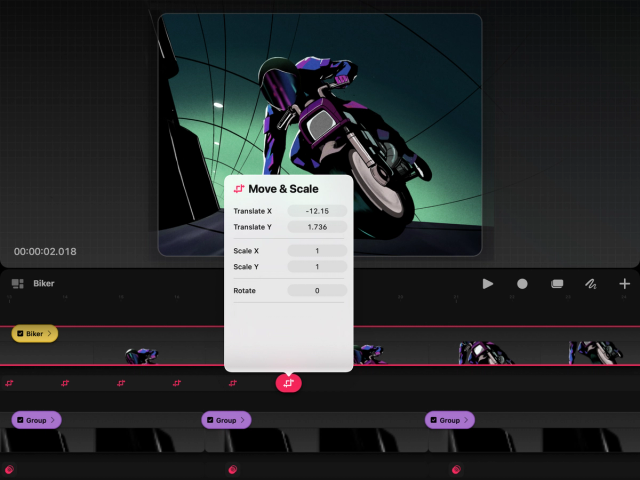

Set your Playhead position by tapping where you’d like your animation to begin on your content.
Tap the Playhead to open the Action menu.
Tap Move or Filter , then select the type of keyframe you wish to create.
A keyframe track will appear under the content with a highlighted keyframe and a panel with that keyframe’s parameters. Set the parameters you want for this keyframe.
Move the Playhead by tapping the next point along the keyframe track where you would like to add a keyframe. The keyframe icon will turn red to indicate you have moved along the keyframe track, but not set any keyframe parameters.
Tap the highlighted keyframe icon again to create another keyframe. This will open the panel for that keyframe’s parameters so you can set them.
Tap play or scrub the Playhead back and forth to view the animation between the keyframes.
Pro Tip
You can add as many keyframes and types of keyframes to your content as you like. Tap on an existing keyframe at any time to readjust its parameters.
Delete a keyframe or keyframe track
Accidentally set a keyframe or keyframe track, or want to remove one? Delete with a simple tap and hold.
To delete a keyframe, tap and hold on a specific keyframe and tap Delete keyframe in the context menu.
To delete a keyframe track, tap and hold any empty part along a keyframe track, tap Delete in the context menu. Or, select your content and tap the Playhead to open the Action! menu. Swipe left on any Motion, Live Filter or Edit menu item highlighted in red to reveal the Clear option, then tap.
Advanced keyframes
Some keyframes contain more than one parameter. You can expand the keyframe tracks to view, adjust, or delete these parameters individually.
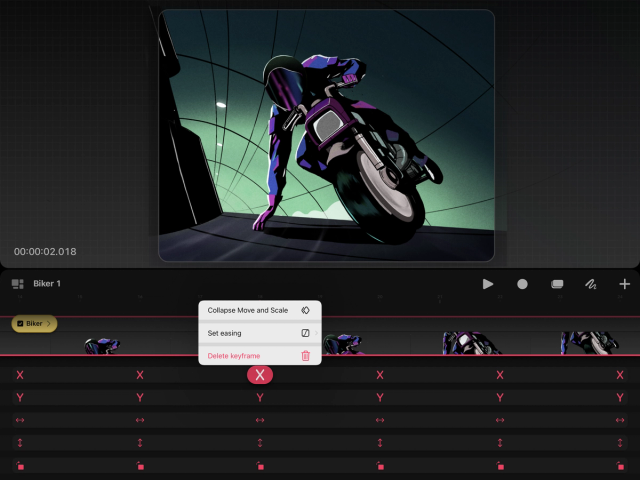

The keyframe types Move & Scale, Noise, and HSB contain multiple parameters. When setting a keyframe for these, a single keyframe and keyframe track will appear under your content. You can expand these keyframe tracks to reveal each parameter contained within that keyframe.
Tap and hold on a keyframe or keyframe track until a context menu appears, and tap Expand .
Once expanded you’ll see individual keyframe tracks for each parameter. These can be adjusted individually to perform advanced actions such as moving, shrinking, and rotating your content all at the same time.
You can also delete individual keyframe tracks for any parameters you aren’t planning to use.
To delete, tap and hold on an individual keyframe or keyframe track until a context menu appears, and tap Delete .
Action menu
Different types of keyframes are found in the Action menu and are a powerful way to apply time-specific movement and effects to your content. Think of them as automated animations you can adjust and edit at any time during your creative process.
Motion keyframes
Motion keyframes allow you to warp, distort, and transform your content. These can make an object move across the Stage, shrink, grow, and warp or distort into different shapes.
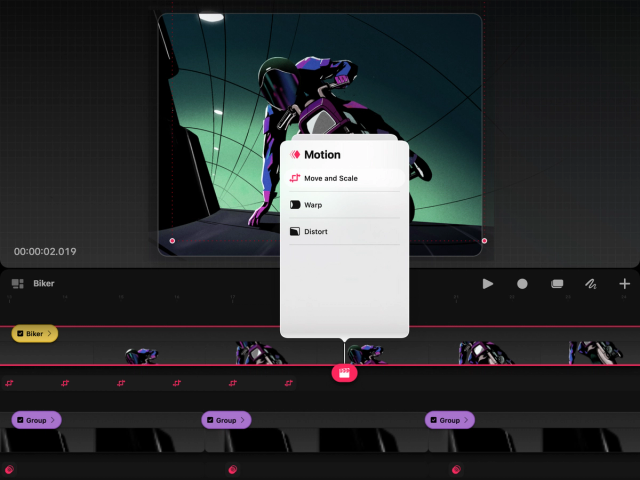

Move
Set a Move & Scale keyframe, then drag your content anywhere on the Stage to position it.
Pro Tip
You don’t need to touch the content or its bounding box to move it. It is often easier to drag elsewhere on the Stage so you can clearly see where you are moving your object.
Scale
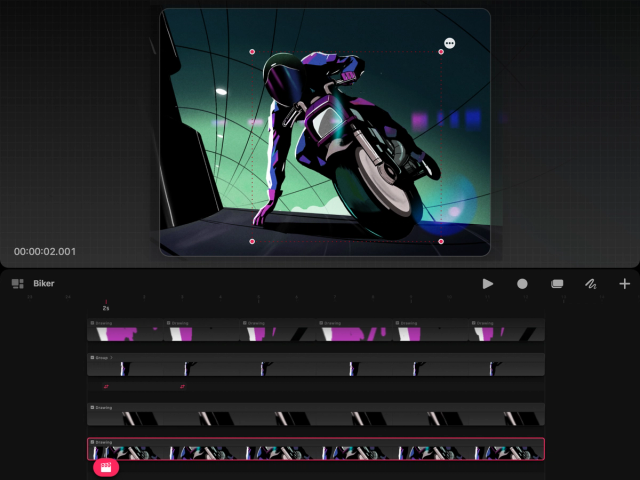

Set a Move & Scale keyframe, then tap a corner node on the bounding box and drag to resize your content.
Rotate
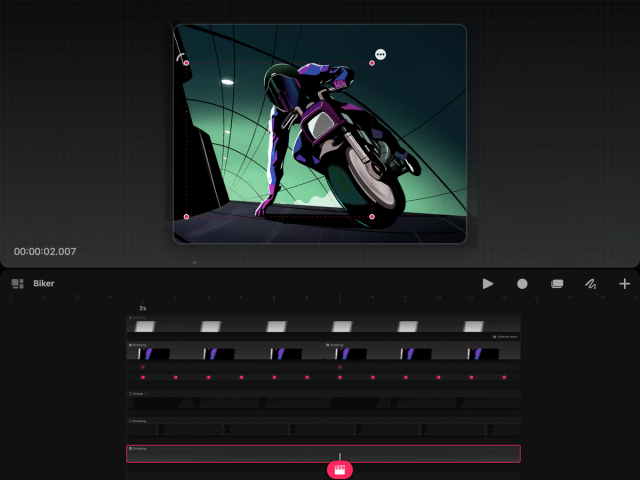

Set a Move & Scale keyframe, then tap the corner node you wish to rotate from. A rotate handle will appear near the corner node. Drag the rotate handle to rotate your content.
Pro Tip
If your content isn’t rotating as expected, you may need to edit the anchor point it rotates around. Learn how to Edit anchor in the Transform section of the Content chapter of this handbook.
Warp
Make eyes widen, flowers blow gently in the breeze, or arms flap about wildly. Warp pushes and pulls pixels around an object to achieve amazing actions.
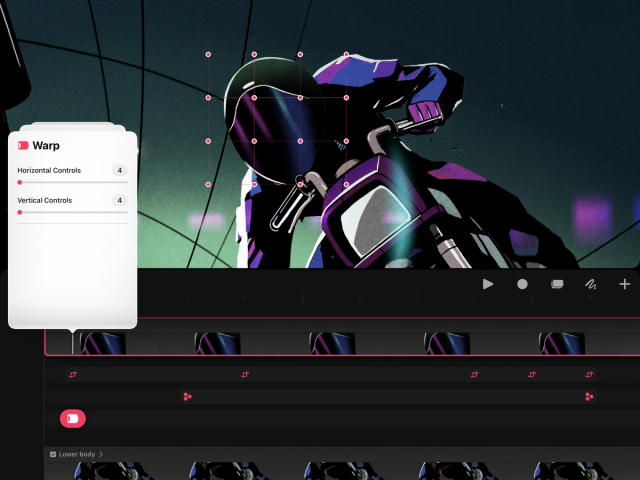

Set a Warp keyframe, then drag any node in the warp mesh to warp your content.
For finer control, use the Horizontal and Vertical Controls to add more nodes to the warp mesh.
Heads Up
Once you have added more nodes using the Horizontal and Vertical Controls, you cannot undo or reset them without restarting your keyframes.
Distort
Play with a scene’s perspective and drastically change the angle of an object. Distort skews the angles of an object while keeping it locked within a bounding box.
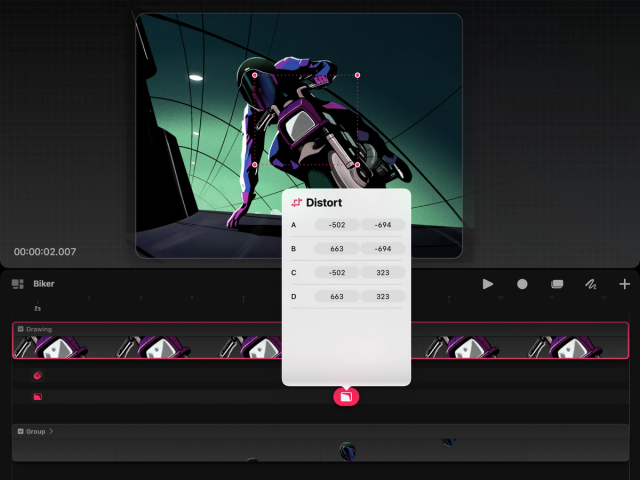

Set a Distort keyframe, then tap a corner node on the bounding box and drag to distort the object.
Live filter keyframes
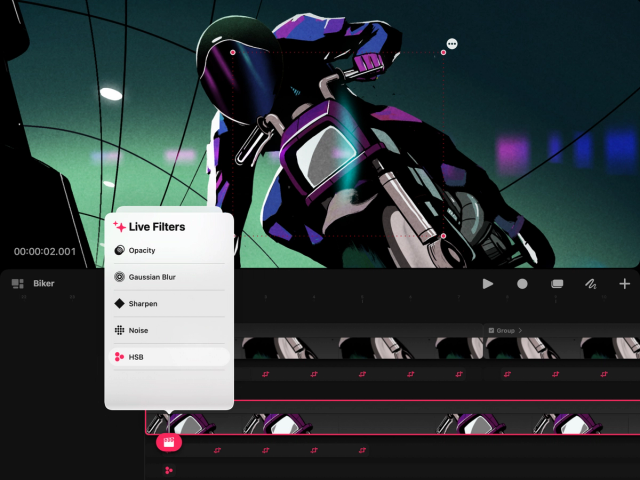

Live filters apply visual effects and color adjustments on objects using keyframes to animate them. These can make content fade away from view, blur as it changes depth of field, or shift colors as lighting changes.
Pro Tip
Live filters are non-destructive. This means you can adjust them at any time without ever permanently affecting the content they are applied to.
Opacity
Make a ghost appear out of nowhere, or a see-through curtain to show the world outside. Opacity changes the transparency of an object across your Timeline.
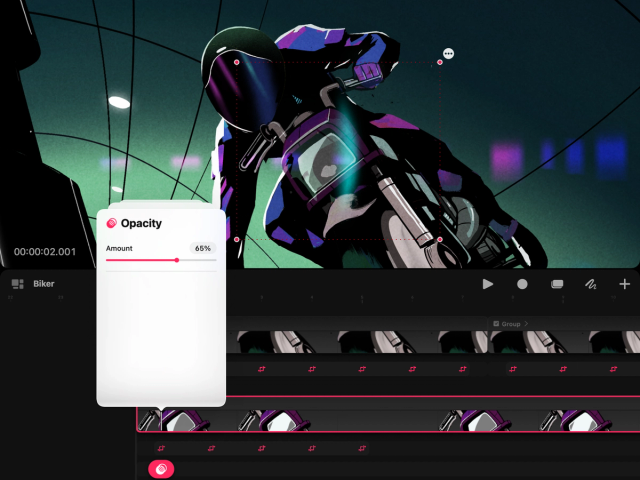

Set an Opacity keyframe and move the slider until you achieve the amount of transparency you want.
Gaussian Blur
Create a soft shadow or shift objects in and out of focus. Gaussian Blur alters how soft and blurry your content appears.


Set a Gaussian Blur keyframe and move the slider until you achieve the amount of blur you want.
Sharpen
Make soft edges look crisper or increase the contrast of your content. Sharpen alters how sharp your content appears.
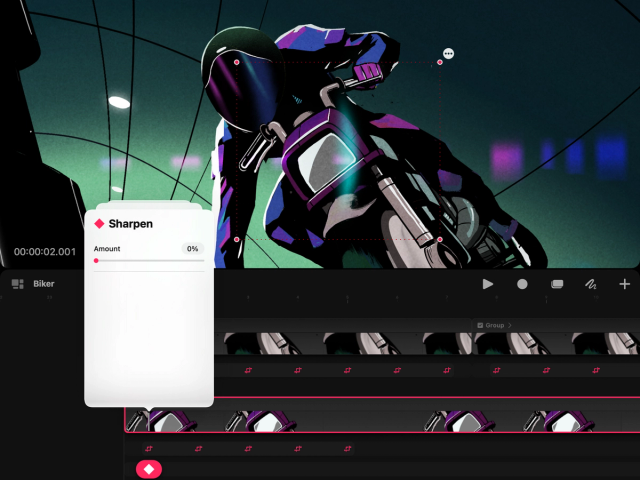

Set a Sharpen keyframe and move the slider until you achieve the amount of sharpness you want.
Noise
Create a film grain look to your animation or add organic texture like clouds and water to your work. Noise alters the amount of speckle and grain that appears on your content.


Set a Noise keyframe, then move the Amount slider to apply some basic Noise until you achieve the amount of grain and texture you want.
Experiment with the other noise buttons and sliders to create cloud, water, and other noise effects.
Pro Tip
There are three types of Noise available in Procreate Dreams — Clouds, Billows, and Ridges. You can also alter the Amount, Scale, Octaves, and Turbulence of Noise. To find out more about how these extra settings affect Noise in Live Filters, see Noise in the Procreate handbook.
Advanced Noise
The Advanced Noise button sits at the bottom of the Noise menu. Use this panel to make your noise appear multi-colored, transparent, and move across the X, Y, and Z planes.
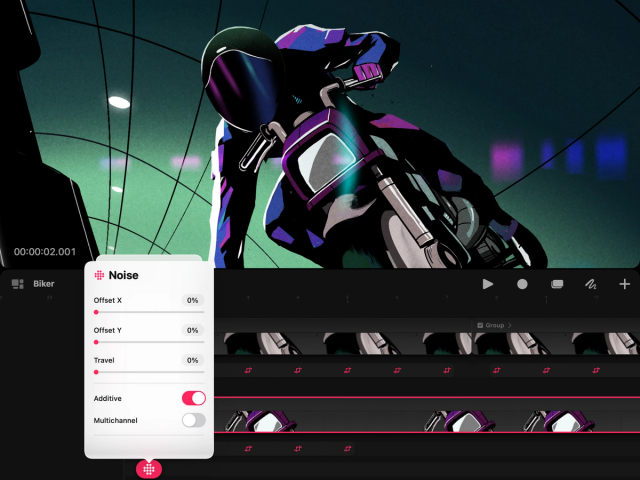
Offset X: shifts the noise horizontally across the X plane.
Offset Y: shifts the noise vertically across the Y plane.
Travel: shifts the noise up and down through a third Z plane. Although Procreate Dreams’ noise appears 2D on screen, it is created in a 3D space similar to a cube. Sliding Travel will pass through the third dimension of the noise on the Z axis.
Additive: toggles Additive Noise on and off. With Additive Noise on Noise becomes transparent and lets your image show through even when set to 100%. With Additive Noise toggled off the Noise is opaque and will completely obscure your image with Noise when set to 100%.
Multichannel: sets the Noise from mono to multi-colored.
HSB (Hue, Saturation and Brightness)
Shift the colors of an object, change its brightness, or turn a scene from color to black and white. HSB alters the hue, saturation, and brightness of your content.
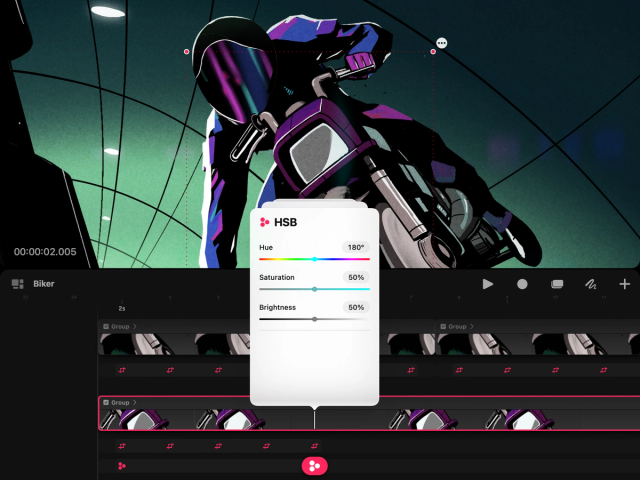
Set a HSB keyframe, then:
Move the Hue slider until you find the color you want to shift your content to.
Move the Saturation slider until you achieve the intensity of color you want.
Move the Brightness slider until you achieve the amount of brightness you want.
Lens Blur
Create a convincing 2D lens blur effect while controlling your image's brightness and contrast.
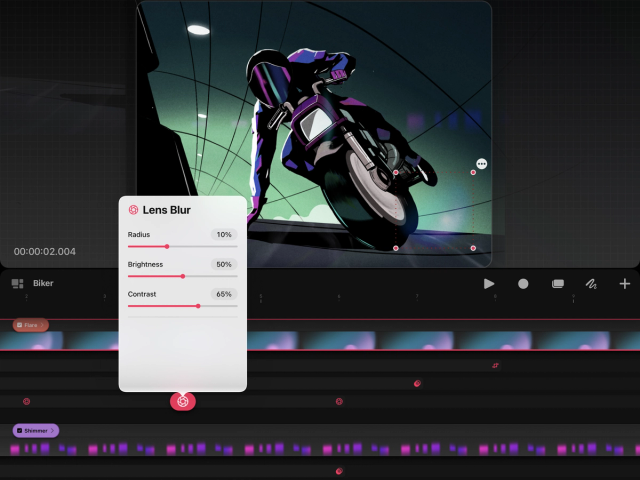
Lens blur occurs when a camera lens focuses on a single object, the focal point. Objects in the foreground and background distant from a focal point begin to blur. The further away an object is from a focal point, the blurrier it becomes. Lens Blur in Procreate Dreams is based on this effect.
Although lens blur is essentially a 3D effect, Procreate Dreams replicates this effect in 2D by applying it to layers that act as a foreground or background. Unlike Gaussian blur which affects an entire image evenly, lens blur affects the highlights in an image more making brighter areas bloom. You can adjust the highlights and lowlights of an image using the Brightness and Contrast sliders. Set a Lens Blur keyframe, then:
Move the Radius slider until you achieve the amount of lens blur you want.
Move the Brightness slider until you achieve the amount of brightness you want.
Move the Contrast slider until you achieve the amount of contrast you want.
Heads Up
Lens Blur is supported on all M-series iPads.
Volume
Adjust the volume level of audio in your videos to fade in, fade out, or just be a little quieter.
Set a Volume keyframe, then:
Move the Volume slider to the level you require.
Volume keyframes in the Action menu will only appear in video content that contains audio.
Sorry. We’re having trouble copying to your clipboard.
Try directly copying the link below.
Still have questions?
If you didn't find what you're looking for, explore our video resources on YouTube or contact us directly. We’re always happy to help.
