Dreams ハンドブック
クリップボードにコピーができませんでした。
以下のリンクをコピーしてみてください。
カラー
カラーを選択、調整、ドラッグ & ドロップし、ムービーに色をつけます。カラーハーモニー機能が、作品の雰囲気に合った補色を提案します。
お知らせ
「カラー」は、Flipbook または「描画」での作業中に利用可能な「描画 & ペイント」モードでのみ使用できます。
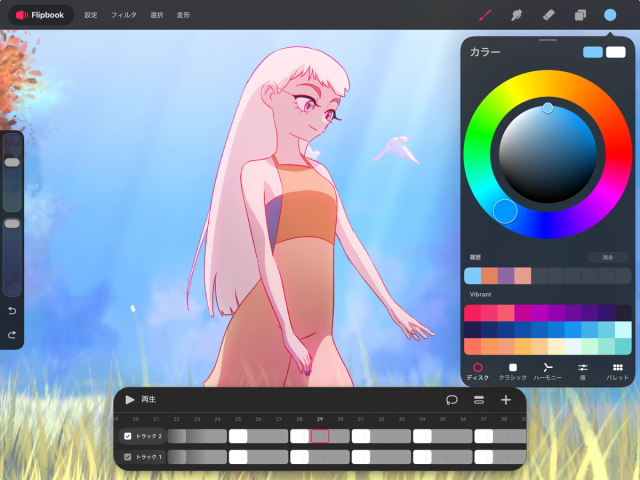
カラーのインターフェイス
「カラー」で、ムービーに必要なすべてのカラーを選択、修正、保存します。
アクティブカラーを長押しすると、現在選択中のカラーと最後に使ったカラーの切り替えができます。アクティブカラーを「ステージ」にドラッグすると、ColorDropが開きます。ColorDrop を使うと、アートワークの領域を素早く塗りつぶせます。
「カラーパネル」右側の最上部には2つの長方形があり、左側に選択中のプライマリーカラー、右側に第2のカラーが表示されます。
第2のカラーは通常、最後から2番目に使用したカラーで、ブラシの「カラーダイナミクス」で使用できます。ブラシの「カラーダイナミクス」(対応しているブラシの場合)で特定の表現をしたい場合は、第2のカラーを手動で設定してください。
第2のカラーをタップします。
「ディスク」「クラシック」「ハーモニー」「値」または「パレット」からカラーを1つ選択します。
カラーホイールには丸いマーカー(レチクル)があります。この透明な円をドラッグしてカラーを選択します。
小さい方の第2のマーカーをドラッグすると、円が左右に分かれて2つのカラーが表示されます。円の右側に、マーカーが上空待機しているカラーを表示。左側には、履歴の中で直近のカラーが表示されます。この機能を使うと、新規に選択したカラーと最後に使用したカラーの色味を比較できます。
履歴セクションには、直近で使った10色が表示されます。
新規ムービーを初めて開いたときは、履歴セクションには何もありません。カラーを選択するたびに履歴に追加されます。「クリア」をタップすると、カラーの「履歴」が消去されます。
適用中のデフォルトパレットは、「カラーパネル」の下部に表示されます。 デフォルトパレットは「ディスク」「クラシック」「ハーモニー」「値」タブで、「カラーパネル」下部に表示されます。「パレット」タブでも表示されます。
Procreate Dreams では、さまざまな方法で新たなカラーを探索、選択できます。
初めて「カラーパネル」を開くと、デフォルトで「カラーディスク」が表示されます。プロジェクトに最適なカラーを探す上で役立つオプションを、以下に紹介します。「カラーパネル」の下部にあるタブをタップして、以下のいずれかのモードに切り替えます。
カラーディスク
Procreate Dreams では、カラーを選択する主な方法として、Procreate 独自の「カラーディスク」を採用しています。
「カラーディスク」には、内側に「彩度」ディスク、それを囲むように外側に「色相」リングがあります。レチクル(丸いマーカー)を動かして希望のカラーを選択し、「カラーパネル」の外側をタップするとパネルが閉じます。
プロの技
彩度ディスクの周囲をダブルタップすると、現在の選択値に最も近い「基準」値にスナップします。例えば、純白、純黒、中間グレー、彩度50%、最大彩度などです。

外側のリング上のレチクル(丸いマーカー)を動かして色相を選択し、内側のリング上のレチクルを動かして彩度と明度を調整します。
左から右に行くほど彩度が高くなり、下から上に行くほど明るくなります。
プロの技
「彩度」ディスクをピンチアウトするとディスクが拡大され、彩度や明度の値をさらに細かく設定できるようになります。
クラシックピッカー
クラシックカラーピッカーでは、より一般的で使い慣れた操作感でカラーを選べます。正方形が表示され、彩度(左=低い、右=高い)と明度(上=明るい、下=暗い)を調整できます。
また、正方形の下にあるスライダーで色相を調整でき、さらにその下には彩度と明度のスライダーもあります。

カラーハーモニー
「ハーモニー」のカラーピッカーは、アクティブカラーと調和するカラーを選ぶのに役立ちます。「カラーパネル」で「ハーモニー」タブをタップします。Procreate Dreams には、補色配色、補色スプリット配色、類似色相配色、トライアド配色、テトラード配色の5つのカラーハーモニーのアルゴリズムが用意されています。

「カラーパネル」の左上でカラーハーモニーのアルゴリズムを選択します。デフォルトは「補色配色」です。
プライマリーカラーのマーカーをカラーホイール上でドラッグし、アクティブカラーを選択します。このマーカーを動かすと、第2のカラーのマーカーの位置と値が変わります。
プライマリーカラーのマーカーをカラーホイール上でドラッグし、アクティブカラーを選択します。このマーカーを動かすと、第2のカラーのマーカーの位置と値が変わります。
お知らせ
選択した「ハーモニー」アルゴリズムによっては、表示されるマーカーの数が増えます。
プライマリーカラーのマーカーをカラーホイール上でドラッグし、アクティブカラーを選択します。このマーカーを動かすと、第2のカラーのマーカーの位置と値が変わります。
値ピッカー
この値ピッカーでは、以下のスライダーを使ってカラーを選択または変更できます。上部の3つのスライダーでは、それぞれ色相と明度、および彩度を調整します。その下の3つのスライダーでは、赤(R)、緑(G)、青(B)の各値をベースにカラーを調整できます。これらをすべて最大値にすると、カラーは白になり、ゼロにすると黒になります。

また、16進数の値を直接入力することもできます。16進数とは、赤、緑、青の値を6桁の数字と文字(A~Fと0~9)で表す方法です(00 = 0、FF = 255)。最初の2文字は赤、次の2文字は緑、最後の2文字は青を表します。
プロの技
英数字フィールドをタップすると、16進数の値をコピーまたはペーストできます。これは、他の場所からコピーしたカラーを自分のプロジェクトで使いたい場合に便利な機能です。
パレット
「パレット」タブでは、パレットの作成や整理ができます。「パレット」とは、他の「カラー」タブでも使える「カラーのスウォッチ」のコレクションです。選択中のパレットには、パレット名の横にチェックマークが表示されます。別のパレットを有効にするには、右端の「…」アイコンをタップして「アクティブに設定」を選択します。このタブでは、パレットの複製や削除も可能です。

また、パレットを長押しして持ち上げ、配置を変更したり、右上の「+ 」ボタンをタップして新しいパレットを作成したり、パレットのタイトルをタップして名前を変更したりできます。
プロの技
どの「カラー」ピッカーモードでも、パレットを描画エリアにドラッグすると SwatchDrop を使用できます。これは ColorDrop のスウォッチ版です!ColorDrop と同じように、長押ししたまま左右にドラッグしてしきい値を調整します。この方法を使えば、異なるカラーで各領域を素早く塗り分けることができます。
カラーコンパニオン
「カラーパネル」を右上から移動させたい場合は、「カラーコンパニオン」で任意の場所に配置できます。


カラーパネルの上部にあるグレーの小さなハンドルをドラッグして、上部のメニューバーから引き離すと、パネルは「カラーコンパニオン」になります。グレーのハンドルを使って、画面上のどこにでもドラッグでき、右上の小さなグレーの「×」をタップすると、右上に戻すことができます。
プロの技
「パレット」タブを開いている時に、「コンパクト」または「カード」ビューの一番上までスクロールすると、「カラー履歴」にアクセスできます。
ColorDrop
ColorDrop は Procreate Dreams の塗りつぶしツールです。これを使えば、アートワークの領域を均一なカラーで素早く効率的に塗りつぶせます。

アクティブカラーをアートワークの任意の領域にドラッグします。
指を離すと、その領域が選択したカラーで塗りつぶされます。
選択したカラーは、境界にぶつかるまで外側に広がります。境界の一例に、アウトラインや異なるカラーの領域があります。
ColorDrop のしきい値
ColorDrop のしきい値を操作して、ColorDrop による塗り足しの範囲をアートワークのエッジまでにするか、外側までにするか調整します。
しきい値を低くすると、カラーは小さな領域の中に留まります。しきい値を高くすると、アウトラインまでカラーが塗り足され、その外側の領域も塗りつぶされます。
ColorDrop のしきい値の調整方法:
アクティブカラーを塗りつぶしたい領域の上にドラッグし、そのままホールドしてください。しばらくすると、ColorDrop のしきい値がアクティブになります。アートワーク上部の細いバーが、しきい値の量を示します。
ホールド中の指または Apple Pencil を左右にドラッグしてしきい値を調整します。
指または Apple Pencil を持ち上げて、塗りつぶしを確定します。
ColorDrop は、設定が変更されない限り、選択したしきい値の設定を記憶します。100%に設定している場合、カラーのオーバーフローを避けるために97.6%で保存されます。
塗りつぶしを続ける
ColorDrop を使用すると、インターフェイス上部に「塗りつぶしを続ける」オプションが表示されます。ここをタップすると、「塗りつぶしを続ける」モードが開きます。ここで別の領域をタップすると、アクティブカラーがその領域を塗り足します。

ColorDrop の横にあるチェックマークをタップして、「塗りつぶしを続ける」モードを終了します。
プロの技
長押ししながらタップを繰り返すと、塗りつぶしごとにしきい値を調整できます。「塗りつぶしを続ける」間に、カラーの変更もできます。
スポイト
「ステージ」のどこからでも新規のカラーを瞬時にサンプルできます。

「ステージ」の任意の場所を長押しすると、スポイトが表示されます。
スポイトが表示されたら「ステージ」上の任意の場所にドラッグし、指を離してカラーを選択します。
新規のカラーはルーペの上半分、現在のカラーは下半分に表示されます。
指を離すと新規のカラーが選択され、アクティブカラーとして設定されます。
クリップボードにコピーができませんでした。
以下のリンクをコピーしてみてください。
お探しのものが見つかりませんか?
探しているものが見つからない場合は、YouTube動画のリソースを検索するか、直接お問い合わせください。いつでも喜んでお手伝いさせていただきます。