Procreate Handbook
Sorry. We’re having trouble copying to your clipboard.
Try directly copying the link below.
Options
Access and adjust options for individual frames of your animation.
Frame Options
Hold, Duplicate and Delete frames in your animation Timeline.


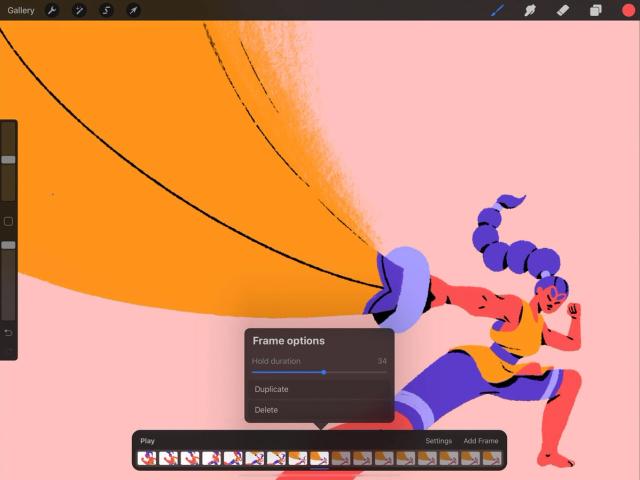
Tap a frame in the Timeline to select it, and tap it again to bring up the Frame options menu.
This menu controls settings that affect individual frames within your animation.
To change settings for the overall animation and the Animation Assist interface, see Settings .


Hold Duration
Adjust a simple slider to hold a single drawing for multiple frames, creating a pause in movement.
In animation, a ‘hold’ creates a moment of stillness by playing the same drawing over multiple frames. The more frames the hold lasts over, the longer the image stays still. Holds are used in animation to adjust timing and rhythm.
Drag the Hold duration slider to your desired number of frames, up to a maximum of 120.
Pro Tip
You can figure out your hold duration using trial and error by watching the playback and adjusting your hold until it looks right. Or, you can figure it out mathematically. For example, if your animation is set to run at 12 frames per second, and you want to create a one-second hold, set your hold to 12 frames.
The Timeline shows you a representation of your hold as a series of greyed-out frames. If your hold lasts for 5 frames, you will see 5 greyed-out frames in your Timeline.
You can get rid of a hold by dragging the slider back to None.


Duplicate / Delete
Quickly replicate or get rid of a frame.
Tap a frame to select it, and tap it again to open Frame Options.
Tap Duplicate to create a copy of your selected frame beside it in the Timeline. Or, to get rid of a frame, tap Delete.
Either option can be undone immediately afterwards with a two-finger tap.

Animation Foreground
Create a locked-in floating foreground layer for animation.
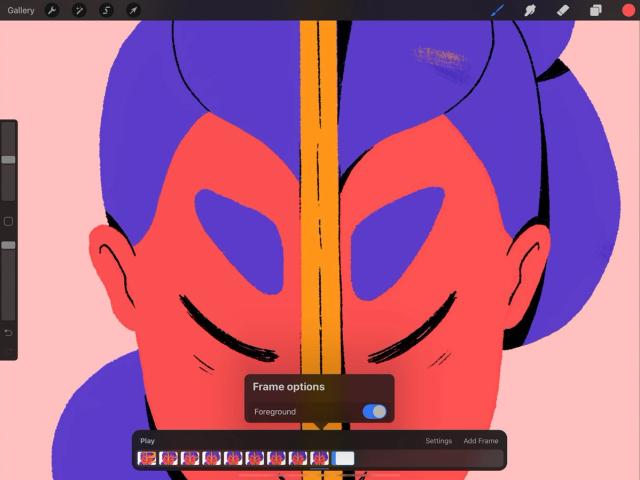
Foreground locks a frame into place as a consistent foreground element that will appear over the top of every other frame of your animation.
In the Timeline, tap the rightmost frame to bring up Frame Options, then tap the Foreground toggle.
Only the rightmost frame can be assigned as a Foreground. You can only have one Foreground at a time. Move any frame to the rightmost position in order to set it as the Foreground.
All layers created subsequently appear to the left of the Foreground frame, and cannot be moved past it. Likewise, the content of these frames will always be overlapped by the content of the Foreground frame.
If you open the Layers panel, you’ll notice your Foreground is locked in the top position, and cannot be dragged any lower.
Tap the Foreground toggle again to revert a Foreground frame back to a normal frame.

Animation Background
Create a locked-in underlying background layer for animation.
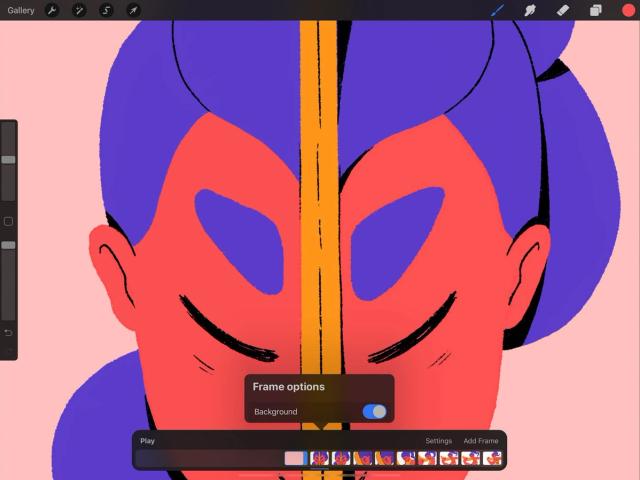
Background locks a frame into place as a consistent background element that will appear underneath every other frame of your animation.
In the Timeline, tap the leftmost frame to bring up Frame Options, then tap the Background toggle.
Only the leftmost frame can be assigned as a Background. You can only have one Background at a time. Move any frame to the leftmost position in order to set it as the Background.
All layers created subsequently appear to the right of the Background frame, and cannot be moved to the left of it. Likewise, the content of these frames will always overlap the content of the Background frame.
If you open the Layers panel, you’ll notice your Background frame is locked in the bottom position, and cannot be dragged any higher.
Tap the Foreground toggle again to revert a Foreground frame back to a normal frame.
Sorry. We’re having trouble copying to your clipboard.
Try directly copying the link below.
Still have questions?
If you didn't find what you're looking for, explore our video resources on YouTube or contact us directly. We’re always happy to help.