Procreate Handbook
Sorry. We’re having trouble copying to your clipboard.
Try directly copying the link below.
Create
Choose from a variety of preset canvases, or dive into Custom Canvas options to set the stage for your creation.
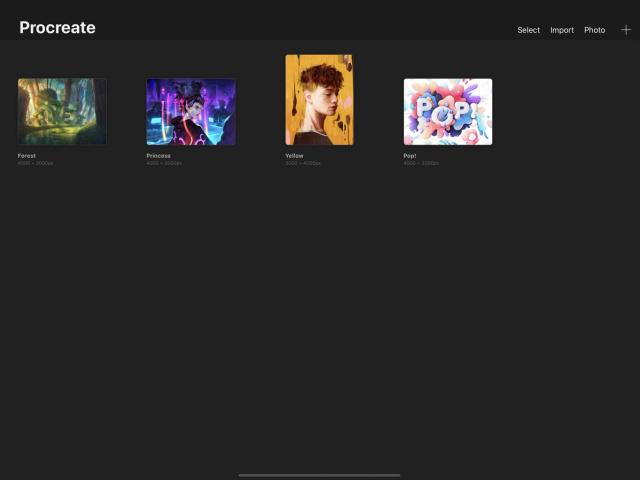
Create a Canvas
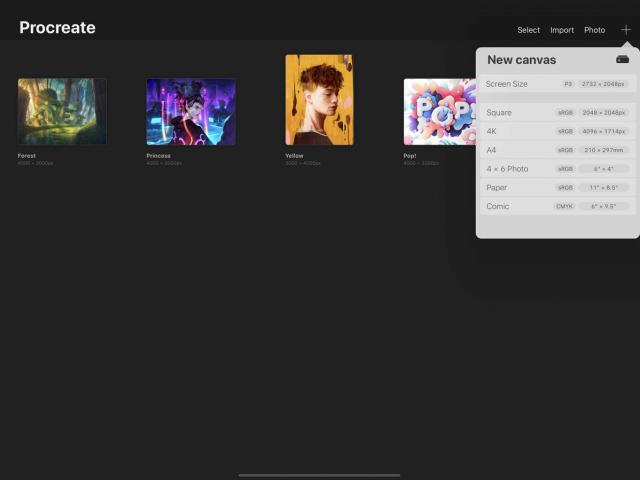
Create a new canvas by tapping the + symbol at the top right of the Gallery to bring up the New Canvas menu.


Use a Template
Procreate offers a variety of preset canvas templates to make creating your new project quick and easy.

Canvas Templates
Choose from preset canvas templates in a range of useful sizes.
In the New canvas menu, you’ll see a list of preset canvases. These templates include Screen Size, Square, high-resolution 4K, A4 paper, 4 x 6 Photo, and US Paper.


Edit or Delete Presets
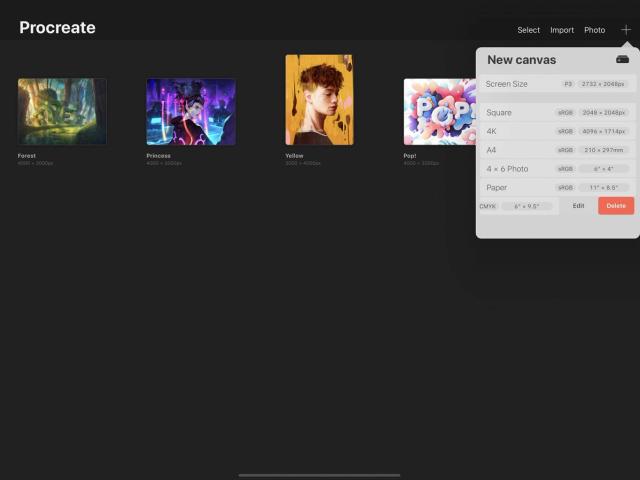
Swipe left on a preset canvas to edit or delete it.
Tap the Edit button to enter the Custom Canvas interface. Here you can adjust the canvas attributes detailed below, and check the maximum number of layers your canvas can offer.
Create a Custom Canvas
When preset sizes aren't working for you, edit or create your own canvas to suit.
Custom Canvas Screen
Tap the + icon to bring up the New Canvas menu, then tap the icon of a rectangle with a + in the top right to bring up the Custom Canvas screen.
Here, you can adjust your canvas in the following ways:
Name
Dimensions
Color profile
Time-lapse settings
Canvas properties
Change the name of your canvas.
Tap the words Untitled Canvas at the top of the screen to bring up the system keypad. Type out a new name for your custom canvas preset, and tap Return to commit.
Change Width, Height, or DPI of your new canvas preset.
Tap on the value you want to adjust. This will reveal a numerical keypad below, where you can enter the size you need.
Pro Tip
Changing the size of your canvas will change the number of Maximum Layers available. Larger canvases offer fewer layers. Smaller canvases offer more.
Your canvas can be as small as 1 x 1 pixels or as massive as 16K in one direction, depending on your iPad model.
Canvas size can be set in Millimeters, Centimeters, Inches, or Pixels. You can change this unit of measurement using the buttons on the left of the keypad at the bottom of the screen.
Color Profiles are different ways for your artwork to manage color.
RGB is best for artwork created to be seen on screens, as it manages color the same way screens do: by seeing colors as mixtures of red, green, and blue.
CMYK is the best option for artwork destined for print. This sees each color as a mix of cyan, magenta, yellow, and black, which is how most commercial printers handle color.
By choosing the color space best matched to your artwork destination, you will get more vivid and accurate color results. If you're not sure which color space is best for you, the default setting is best.
Procreate comes pre-loaded with nineteen color profiles tailored to a broad range of screen and print purposes. The default profiles - Display P3 and Generic CMYK Profile - should suit the needs of most artists.
Tap Import to add your own color profiles.
Pro Tip
With a P3 canvas you can use extra saturated greens, reds, and oranges.
Procreate can record your progress through a piece of artwork, and play back a high-speed time-lapse video of the process afterwards.
You can now choose different Time-lapse Settings for each new Canvas you create: select the resolution of your video from 1080p to full 4K, and tweak recording quality settings from Low (smaller file size, good for sharing) to Lossless (perfect quality with no loss of detail, but a larger file size).
HEVC is a new form of video compression for advanced motion graphics creation. It can be toggled on or off.
Learn more about Time-lapse Video
Under Canvas properties you can select a default background color for your canvas preset, or choose to keep the background hidden.
Sorry. We’re having trouble copying to your clipboard.
Try directly copying the link below.
Still have questions?
If you didn't find what you're looking for, explore our video resources on YouTube or contact us directly. We’re always happy to help.
