Procreate Handbook
Sorry. We’re having trouble copying to your clipboard.
Try directly copying the link below.
Interface and Basics
Master animation with professional motion graphics tools in a clean and simple interface.
Activate
Invoke the Animation Assist interface.

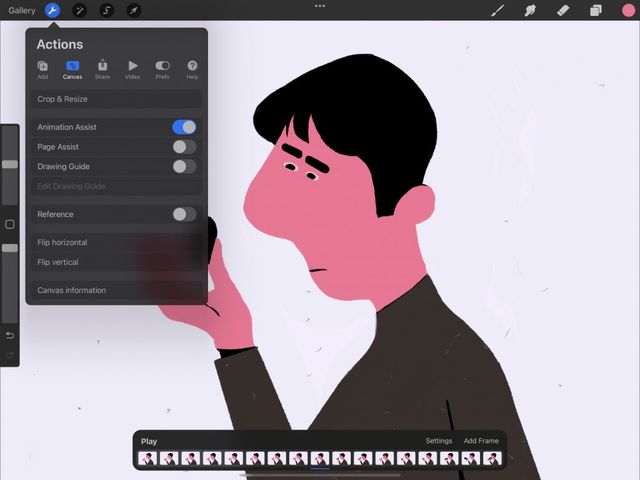
Tap the wrench button in the top left of the screen to open the Actions menu. Tap Canvas, and flip the Animation Assist toggle switch.
The Animation Assist interface is now active.
To exit the Animation Assist interface, repeat the process above.
Animation Assist Screen
Master animation fast with a visual Timeline of your frames, onion skinning to help you track your progress, instant playback, and versatile settings.
When you invoke Animation Assist, the screen will zoom to display your whole artwork. This will allow you to see your entire animation.
All existing layers in your artwork are now shown in Animation Assist as frames in the Timeline.
Your canvas displays your currently selected animation frame at full opacity.
When you first open Animation Assist, Onion skin frames are switched on by default.
Draw and paint on your canvas as normal. Your changes will affect the currently selected frame in your Timeline.
The Timeline represents every layer or grouped layer as frames of your animation using thumbnails.
It is like the Layers panel, but turned sideways. The bottom layer of your Layers panel will be the far left frame in the Timeline. This shows the frames in chronological order from left to right.
You can navigate through the Timeline in a few ways:
Tap a frame to jump to it
Drag the timeline back and forth
Flick the timeline for rapid scroll
Your currently selected frame is underlined in blue.
Pro Tip
If you require multiple objects in a single frame of your animation you can use grouped layers Grouped layers are treated as a single frame in the Timeline. To find out more about organizing layers and groups, check out the Organize section of Layers in this Handbook.
Live playback lets you preview your animation without interrupting your workflow.
To preview your animation, tap Play. You can stop the playback by tapping your canvas, your Timeline, or by tapping Pause.
Add a blank frame to your animation.
Tap Add Frame at any time to add a blank frame next to your current frame in the Timeline.
Tap any frame to bring up frame-specific options.
The Frame Options menu gives you a variety of settings that apply to individual frames. Duplicate, Delete, or adjust the Hold Duration on a frame.
Sorry. We’re having trouble copying to your clipboard.
Try directly copying the link below.
Still have questions?
If you didn't find what you're looking for, explore our video resources on YouTube or contact us directly. We’re always happy to help.
