Procreate Handbook
Sorry. We’re having trouble copying to your clipboard.
Try directly copying the link below.
Basics
Before you start 3D Painting in Procreate it may help to understand the basics of 3D modeling and painting.
UV Maps
To be paintable in Procreate, a 3D model needs a base layer around it. This is called a UV map. You cannot paint on a 3D model in Procreate unless it has one of these.
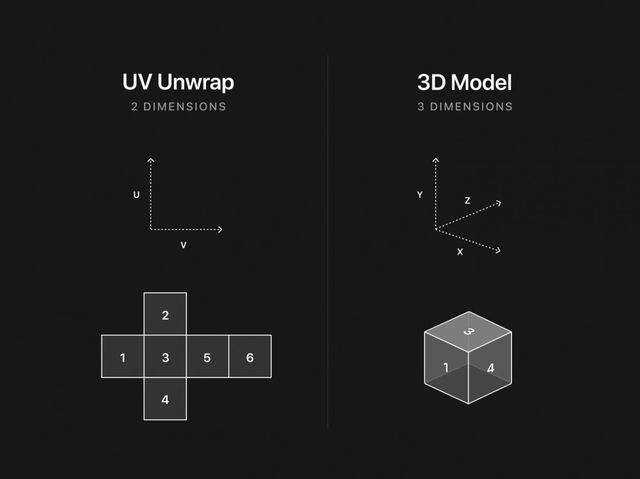
A UV map is a 2D representation of the surface of your 3D model. Kind of like a perfectly tailored piece of thin cloth. This forms the surface you paint on. So, if we take a simple example of a cube, the UV map would look like this:

The cube represents a 3D model imported into Procreate as a .usdz and .obj it exists purely in 3D space. The UV map is the skin unwrapped from around the cube and flattened out in 2D space.
Not all 3D models contain UV maps, and just because a model has a UV map and imports into Procreate, doesn’t mean that the map will be good for 3D Painting.
If you’re using a downloaded model from the internet, it’s important to remember that the modeler didn’t necessarily make the model to be painted on. There may be gaps in the UV maps, missing parts, or parts that are overlapping.
3D Painting in Procreate
Painting on a 3D model’s UV Map in Procreate works like it would on a normal 2D canvas.
Try opening a 3D model from the Model pack, select a brush and color, and then try painting on the 3D model. If you don’t see any color appear on the model, try tapping the area you want to paint until it briefly flashes blue. Paint on that area again, and you should now see color appear on your model.
When you open a suitable 3D model, it will contain at least one Base Layer. When you lay down paint, it will appear on the 3D model and on the selected Base Layer in the Layers Panel. You can also create your own layers to paint on. This will keep the Base Layer unaffected and is the best way to 3D paint in a non-destructive way.
To find out more about how to use layers when 3D Painting check out Layers in the 3D section of this handbook.
Sorry. We’re having trouble copying to your clipboard.
Try directly copying the link below.
Still have questions?
If you didn't find what you're looking for, explore our video resources on YouTube or contact us directly. We’re always happy to help.