Procreate Handbook
Sorry. We’re having trouble copying to your clipboard.
Try directly copying the link below.
Share
Share your 3D creations with the world. Export as a model, image or video in a variety of useful formats.
Procreate gives you three options for sharing 3D painting models:
Share Model for sharing your work in 3D formats
Share Image for sharing your work in image and video formats
Share Textures for sharing your work in 3D formats as a flattened image
Share Model
To access the Share Model options tap Actions > Share.
Under the Share Model section of the Share menu are three formats ideal for exporting as 3D files. Each format has different uses and offers different benefits.
Procreate
Exports your 3D model and artwork as a file other Procreate users can use.
Tap Actions > Share > Procreate.
USDZ
Exports your 3D model and artwork as a file other MacOS, iPadOS and iOS users can use in other 3D software applications.
Tap Actions > Share > USDZ.
Pro Tip
USDZ files work well for AR applications in iOS and iPadOS.
OBJ
Exports as a folder containing your 3D model, associated textures and artwork files certain other 3D Applications can use.
Tap Actions > Share > OBJ.
OBJ files are one of the most commonly used 3D formats and widely used in 3D printing.
Share Image
Export your 3D Painting as a JPEG, PNG or TIFF image, or as an animated GIF, PNG, MP4 or HEVC.
To access the Share Image options tap Actions > Share.
Under the Share Image section of the Share menu are three formats for exporting 3D files as images and four formats for video. Each format has different uses and offers different benefits.
Any image or video you export will include the lighting and environment you have used on your 3D model.
The images will reflect your working space, remembering the last angle and zoom your 3D model was positioned in.
JPEG
Export your 3D artwork as a versatile, web-ready JPEG file.
Tap Actions > Share > JPEG, then select a destination for your file.
Why use .JPEG format?
JPEG is a ‘lossy’ format that will flatten your artwork into a single layer. JPEG exchanges a little bit of visual quality for a much smaller file size. One of the most common image formats, JPEGs are heavily supported, making them a versatile option for easy sharing.
PNG
Export your 3D artwork as high-quality web-ready file with transparency.
Tap Actions > Share > PNG, then select a destination for your file.
Why use .PNG format?
PNG is a ‘lossless' format - it will flatten your artwork but keep full image quality. While slightly larger in file size than JPEGs, PNGs are just as versatile. They also have the big advantage of preserving transparency in your artwork.
Pro Tip
You’ll need to turn off the Show Environment toggle in Actions > 3D > Edit lighting & environment > Environment to export your artwork with a transparent background.
TIFF
Export your artwork as a hi-res TIFF file.
Tap Actions > Share > TIFF, then select a destination for your file.
Why use .TIFF format?
TIFF flattens your layers but perfectly preserves your image quality. This results in TIFF files being on the larger side. Used for decades in print, it is compatible with all major software. TIFFs are also common in many print workflows, making it a good choice for professionals.
Animated GIF
Export your 3D model with lighting and environment as an animated GIF.
Pro Tip
GIF is the most common and versatile format for web animations.

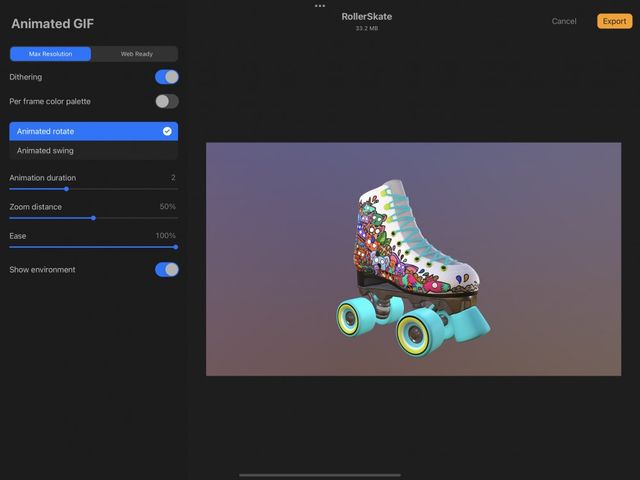
Tap Actions > Share > Animated GIF to open the Animated GIF interface.
Choose between Max Resolution (better quality, larger file size) or Web Ready (lower quality, smaller file size). Animated GIFs loop by default.
Web Ready GIF animations limit the color palette and can create noticeable color banding in your video, to help reduce this tap the Dither toggle on.
Per frame color palette applies a new limited palette to each frame of your video export instead of across the entire video. This can improve the image quality of your video, but will also increase the file size of your final export.
Tap the Per frame color palette toggle to turn this feature on.
Pro Tip
The preview window shows you an accurate representation of what your final video will look like with Dither and Per frame color palette. The best way to be certain about what your final video will look like is to experiment. Export with both these feature turned on and off and compare the results.
Your Animated GIF can either show your 3D object rotating or swinging. Tap Animated rotate and Animated swing to see which you prefer for your export.
Animation duration determines the duration of the animation cycle for your Animated GIF.
Use the slider to find the duration that works best for you. 0 is the shortest and fastest duration, while 5 is the longest and slowest duration.
Zoom distance determines the distance your object zooms out to during its animation cycle.
Use the slider to see what works best for you. 0% keeps your object close to the camera and at the same size for the entire animation cycle. 100% zooms out from the object the most, giving the effect of the object bouncing away from the camera and into the distance before returning.
Ease can add more or less natural momentum to the rotation or swing of your animation. At 0% Ease the animation will appear linear and mechanical. At 100% the animation will appear to slow down and speed up at certain points, giving it a more natural feeling of momentum.
To see this most clearly set Zoom distance to 0% then Ease to 0%. Your object will rotate or swing at an even pace feeling like it has no natural momentum. Slide Ease to 100% and your object will speed up and slow down during the rotation or swing cycle feeling like it has natural momentum.
Your 3D object can be exported with and without an environmental background. Tap Show environment to reveal the Transparent background toggle. Tap toggle on to remove the background.
When Transparent background is on, the Alpha threshold slider becomes active. This can help with any artifacts that may appear on the edges of your animation when exporting Animated GIFs. Slide to 100% to maximize the Alpha Threshold to help reduce artifacts.
Animated PNG
Export your 3D model with lighting and environment as an animated PNG.
Pro Tip
PNG is ideal for animations with transparent elements.

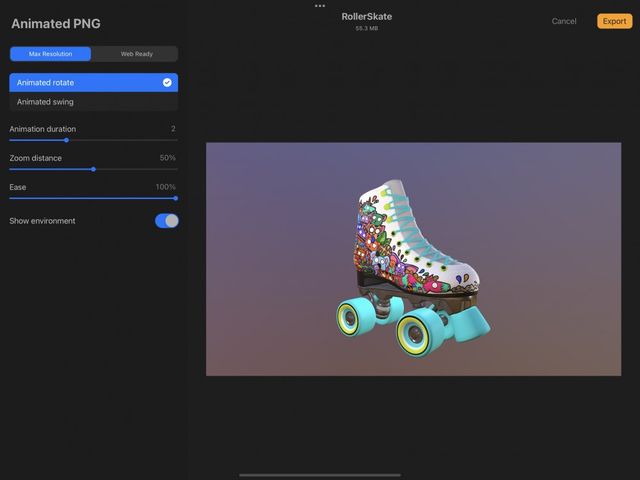
Tap Actions > Share > Animated PNG to open the Animated PNG interface.
Choose between Max Resolution (better quality, larger file size) or Web Ready (lower quality, smaller file size). Animated PNGs loop by default.
Your Animated PNG can either show your 3D object rotating or swinging. Tap Animated rotate and Animated swing to see which you prefer for your export.
Animation duration determines the duration of the animation cycle for your Animated PNG.
Use the slider to find the duration that works best for you. 0 is the shortest and fastest duration, while 5 is the longest and slowest duration.
Zoom distance determines the distance your object zooms out to during its animation cycle.
Use the slider to see what works best for you. 0% keeps your object close to the camera and at the same size for the entire animation cycle. 100% zooms out from the object the most, giving the effect of the object bouncing away from the camera and into the distance before returning.
Ease can add more or less natural momentum to the rotation or swing of your animation. At 0% Ease the animation will appear linear and mechanical. At 100% the animation will appear to slow down and speed up at certain points, giving it a more natural feeling of momentum.
To see this most clearly set Zoom distance to 0% then Ease to 0%. Your object will rotate or swing at an even pace feeling like it has no natural momentum. Slide Ease to 100% and your object will speed up and slow down during the rotation or swing cycle feeling like it has natural momentum.
Your 3D object can be exported with and without an environmental background. Tap Show environment to reveal the Transparent background toggle. Tap toggle on to remove the background.
When Transparent background is on, the Alpha threshold slider becomes active. This can help with any artifacts that may appear on the edges of your animation when exporting Animated PNGs. Slide to 100% to maximize the Alpha Threshold to help reduce artifacts.
Animated MP4
Export your 3D model with lighting and environment as an animated MP4.
Pro Tip
MP4 uses JPEGs as the basis for its frames, offering the potential of a smaller file size.

Animated MP4s offer similar functionality to animated GIFs and PNGs. Because MP4s use JPEG encoding for each frame, they cannot have transparent backgrounds. Their file size tends to be smaller than Animated GIFs and PNGs.
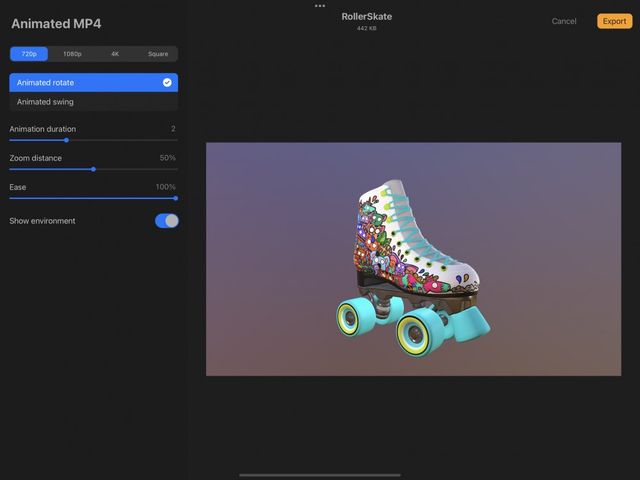
Tap Actions > Share > Animated MP4 to open the Animated MP4 interface.
Choose between 720p, 1080p, 4K or Square Resolution. The higher the resolution the better quality and the larger the file size. With the exception being Square, which exports at 1080x1080p.
Pro Tip
Square is a great size for sharing your 3D creations on social media.
Your MP4 can either show your 3D object rotating or swinging. Tap Animated rotate and Animated swing to see which you prefer for your export.
Animation duration determines the duration of the animation cycle for your Animated MP4.
Use the slider to find the duration that works best for you. 0 is the shortest and fastest duration, while 5 is the longest and slowest duration.
Zoom distance determines the distance your object zooms out to during its animation cycle
Use the slider to see what works best for you. 0% keeps your object close to the camera and at the same size for the entire animation cycle. 100% zooms out from the object the most, giving the effect of the object bouncing away from the camera and into the distance before returning.
Ease can add more or less natural momentum to the rotation or swing of your animation. At 0% Ease the animation will appear linear and mechanical. At 100% the animation will appear to slow down and speed up at certain points, giving it a more natural feeling of momentum.
To see this most clearly set Zoom distance to 0% then Ease to 0%. Your object will rotate or swing at an even pace feeling like it has no natural momentum. Slide Ease to 100% and your object will speed up and slow down during the rotation or swing cycle feeling like it has natural momentum.
Your 3D object can be exported with and without an environmental background. Tap Show environment to reveal the Transparent background toggle. Tap toggle on to remove the background.
Animated HEVC
Animated HEVCs offer similar functionality to animated MP4s. The difference being HEVCs can have transparent backgrounds. Their file size tends to be smaller than Animated GIFs and PNGs.
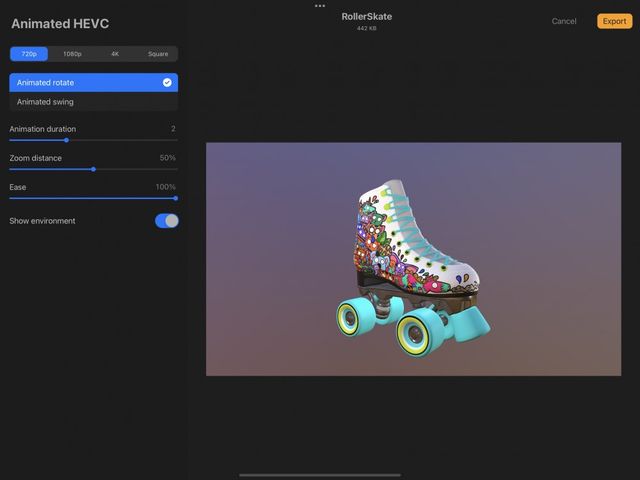
Tap Actions > Share > Animated HEVC to open the Animated HEVC interface.

Choose between 720p, 1080p, 4K or Square Resolution. The higher the resolution the better quality and the larger the file size. With the exception being Square, which exports at 1080x1080p.
Your HEVC can either show your 3D object rotating or swinging. Tap Animated rotate and Animated swing to see which you prefer for your export.
Animation duration determines the duration of the animation cycle for your Animated HEVC.
Use the slider to find the duration that works best for you. 0 is the shortest and fastest duration, while 5 is the longest and slowest duration.
Zoom distance determines the distance your object zooms out to during its animation cycle.
Use the slider to see what works best for you. 0% keeps your object close to the camera and at the same size for the entire animation cycle. 100% zooms out from the object the most, giving the effect of the object bouncing away from the camera and into the distance before returning.
Ease can add more or less natural momentum to the rotation or swing of your animation. At 0% Ease the animation will appear linear and mechanical. At 100% the animation will appear to slow down and speed up at certain points, giving it a more natural feeling of momentum.
To see this most clearly set Zoom distance to 0% then Ease to 0%. Your object will rotate or swing at an even pace feeling like it has no natural momentum. Slide Ease to 100% and your object will speed up and slow down during the rotation or swing cycle feeling like it has natural momentum.
Your 3D object can be exported with and without an environmental background. Tap Show environment to reveal the Transparent background toggle. Tap toggle on to remove the background.
When Transparent background is on, the Alpha threshold slider becomes active. This can help with any artifacts that may appear on the edges of your animation when exporting Animated HEVCs. Slide to 100% to maximize the Alpha Threshold to help reduce artifacts.
Share Textures
Export the Texture Sets from your 3D Painting as PNGs separated into individual material textures.
Tap Actions > Share > Share Textures > PNG.
Each texture in your 3D file will be exported as a PNG under the title of the Texture Set, including:
Ambient Occlusion
Color
Metallic
Normal
Roughness
The size and resolution of the resulting PNGs are tied to the original size and resolution of the 3D model imported into Procreate.
Pro Tip
Share Textures is useful for those wishing to export their 3D Painting into other 3D applications to work on further.
Destinations
Share your files to AirDrop, AirPrint, and any app or service available in the iOS Sharing system.
When you’ve selected your file format, the iOS sharing system triggers automatically.
This allows you quick access to basic system functions such as Copy, Save to Photos, Assign to Contact, Print, and Save to Files.
iOS Sharing also gives you the freedom to export your image to any app linked to the iOS Sharing system. As a rule this includes commonly-used apps such as AirDrop, Messages, Mail, Notes, and plenty more. Available apps will vary depending on which apps you have installed on your iPad.
Sorry. We’re having trouble copying to your clipboard.
Try directly copying the link below.
Still have questions?
If you didn't find what you're looking for, explore our video resources on YouTube or contact us directly. We’re always happy to help.