Procreate Handbook
Sorry. We’re having trouble copying to your clipboard.
Try directly copying the link below.
Share
Share your layers as bulk-exported individual images or multi-page PDF documents. Maybe you'd prefer to export out as a simple looping animation. Procreate makes your artworks more versatile than ever before.
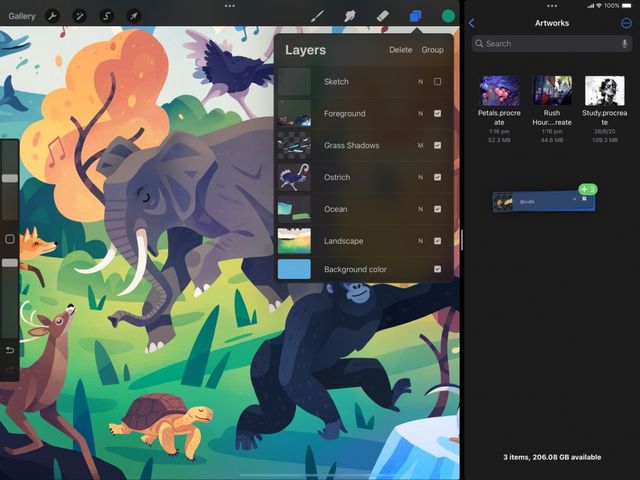
Drag and Drop Export
Export individual layers without leaving your canvas.


Pick up a layer and drag it to any compatible location to export it as an image. Export to other Procreate documents, other apps, or any Apple sharing locations such as iCloud or Files folders.
Bulk export layers by picking up one layer, then tapping others to add them to the stack. You can then Drag and Drop a stack the same way you would a single layer.
Share Layers
Export layers from a single artwork to a multi-page PDF, a folder of PNGs, or as frames of an animated GIF, PNG, or MP4.
Tap Actions > Share. Under the Share Layers section of the Share menu, you’ll find a complete list of layer export formats.
Only visible layers will export.
Holding down the Visibility Checkbox to activate Solo Visibility won't affect layer export. In this case, all visible layers prior to activating Solo Visibility will be exported.
Export all the layers from your artwork to a PDF document.
Tap Actions > Share > PDF, then choose from Good, Better, or Best quality. Select a destination for your file.
Each layer becomes a page in the PDF, with the bottom layer the first page, and the top layer the last.
Bulk export all the layers from your artwork to a batch of PNG files.
Tap Actions > Share > PNG Files and select a destination for your file.
Each PNG is assigned a filename formed of the artwork name plus a sequential number. For example, if your artwork is called Masterpiece. Your PNG files will be named Masterpiece-1, Masterpiece-2, and so on. The bottom layer will be saved as the first file.
Export all the layers from your artwork to an animated GIF.
Tap Actions > Share > Animated GIF to open the Animated GIF interface.
Choose between Max Resolution (better quality, larger file size), or Web Ready (lower quality, smaller file size). Animated GIFs loop by default.
Each layer becomes a frame in the animated GIF, with the bottom layer appearing first.
Use the Frames per second slider to adjust the speed of your animation. You can also add dithering, use a per-frame color palette, and set a transparent background.
Turning the Transparent Background toggle on allows you to set the Alpha threshold amount using a slider.
Tap the Export button in the top right to export your artwork, or tap Cancel to return to your canvas.
Export all the layers from your artwork to an animated PNG.
Animated PNGs offer a higher visual quality than animated GIFs. Be aware animated PNGs are not yet supported everywhere.
Tap Actions > Share > Animated PNG to open the Animated PNG interface.
Choose between Max Resolution (better quality, larger file size), or Web Ready (lower quality, smaller file size). Animated PNGs loop by default.
Each layer becomes a frame in the animated PNG, with the bottom layer appearing first.
Use the Frames per second slider to adjust the speed of your animation. You can also set a transparent background.
Tap the Export button in the top right to export your artwork, or tap Cancel to return to your canvas.
Export all the layers from your artwork to an animated MP4.
Animated MP4s offer similar functionality to animated GIFs and PNGs. As they use JPEG encoding for each frame, they cannot have a transparent background. Their file size tends to be smaller.
Tap Actions > Share > Animated MP4 to open the Animated MP4 interface.
Choose between Max Resolution (better quality, larger file size), or Web Ready (lower quality, smaller file size). Animated MP4s loop by default.
Each layer becomes a frame in the animated MP4, with the bottom layer appearing first.
Use the Frames per second slider to adjust the speed of your animation.
Tap the Export button in the top right to export your artwork, or tap Cancel to return to your canvas.
Export all the layers from your artwork to an animated HEVC.
Animated HEVCs offer similar functionality to animated MPEGs, but can have transparent backgrounds. Their file size tends to be smaller.
Tap Actions > Share > Animated HEVC to open the Animated HEVC interface.
Choose between Max Resolution (better quality, larger file size), or Web Ready (lower quality, smaller file size). Animated HEVCs loop by default.
Each layer becomes a frame in the animated HEVC, with the bottom layer appearing first.
Use the Frames per second slider to adjust the speed of your animation.
For a Transparent Background, turn the toggle on.
Tap the Export button in the top right to export your artwork, or tap Cancel to return to your canvas.
Sorry. We’re having trouble copying to your clipboard.
Try directly copying the link below.
Still have questions?
If you didn't find what you're looking for, explore our video resources on YouTube or contact us directly. We’re always happy to help.
