Procreate Handbook
Sorry. We’re having trouble copying to your clipboard.
Try directly copying the link below.
Add
Import images into your canvas, add text, and use the clipboard for cut, copy, and paste actions.
Insert
Procreate provides you with various ways to insert pictures into your canvas.
Use the Files app to insert an image from any connected location.
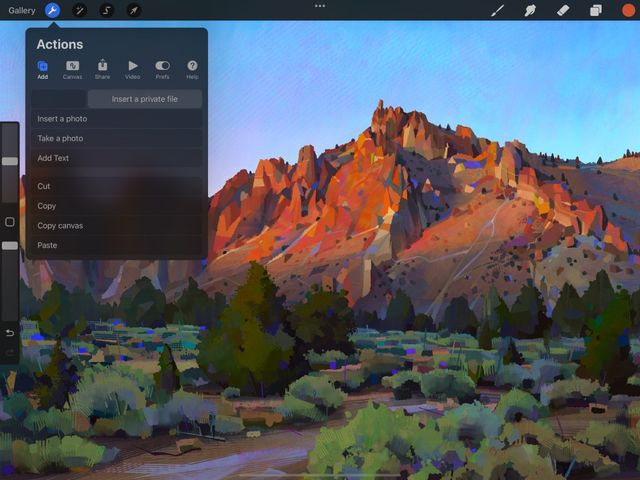
To insert a compatible image file, tap Actions > Add > Insert a file. This will open the Files app displaying your recent images. You can also Browse all your connected folders using the navigation bar at the bottom.
You can import PNG, JPEG, and PSD files.
If you import a PSD this way, it will place in your document as a flattened image. To import a PSD with all layers preserved, you must use Gallery Import .
Use the Photos app to insert an image into your canvas.
To bring a JPEG, PNG or PSD image from your Photos app into your canvas, tap Actions > Add > Insert a photo. Your Photos app will pop up. Scroll through your folders to find photos you’ve taken and images you’ve saved to your iPad.
If you import a PSD this way, it will place in your document as a flattened image. To import a PSD with all layers preserved, use Gallery Import .
Snap a photo with your iPad camera and insert it into your canvas.
Tap Actions > Add > Take a photo to bring up your iPad’s inbuilt camera.
Take a photo, tap Use Photo, and it will appear in any open document ready for use.
Insert a Private Layer
Import a File or Photo as a Private Layer that won’t appear in your Gallery or Time-lapse Videos.
Private layers won't reveal reference images, or other content that isn’t part of your final artwork. Private layers do this without having to delete or turn off layers in your file. A Private Layer behaves like a regular layer in all aspects, except it won't appear in a Gallery preview image or in an exported Time-lapse video.
Insert a File as a Private Layer
Use the Files app to import an image from any connected location as a Private Layer.

To insert a compatible image file as a Private Layer, tap Actions > Add and then slide the Insert a file tab to the left. This will reveal a grey Insert a private file button, tap to bring up the Files app displaying your recent images.
Using the navigation bar at the bottom, you can also Browse all your connected folders. You can import PNG, JPEG, and PSD files. If you import a PSD this way, it will place in your document as a flattened image. You cannot import a layered PSD file as a Private Layer.
Once you've selected an image from the Files app it will appear on your Canvas. It will also appear in your Layers menu with the word Private under the Layer title.
Insert a Photo as a Private Layer
Use the Photos app to import an image into your Canvas as a Private Layer.
To bring a JPEG, PNG or PSD image from your Photos app into your Canvas. Tap Actions > Add and then slide the Insert a Photo tab to the left until it reveals a grey Insert a private photo button. Tap to open your Photos app and select a photo you’ve taken or images you’ve saved to your iPad.
If you import a PSD this way, it will place in your document as a flattened image. You can't import a layered PSD file as a Private Layer.
Once you select a photo it will appear on your Canvas. It will also appear in your Layers menu with the word Private under the Layer title.
Take a Photo as a Private Layer
Snap a photo with your iPad camera and insert it into your Canvas as a Private Layer.
Tap Actions > Add > and then slide the Take a Photo tab to the left until it reveals a grey Take a private photo button. To take a photo, Tap Take a private photo to bring up the Camera app and take your photo.
Once you have taken a photo it will appear on your Canvas. It will also appear in your Layers menu with the word Private under the Layer title.
Cut, Copy or Copy All and Paste to a Private Layer
Paste from your Paste Board and insert it into your Canvas as a Private Layer.
Cut, Copy and Copy Canvas as normal. Find out more on how to Cut, Copy and Copy Canvas in the Cut / Copy / Paste section.
Once a selection, layer or entire image has copied, Tap Actions > Add and then slide the Paste tab to the left until it reveals a grey Paste private button. Tap Paste private to paste your Clip Board contents into a Private Layer.
Once pasted it will appear on your Canvas and in your Layers menu with the word Private under the Layer title.
Add Text
Type editable vector Text into your document to create snappy designs and striking word art.

Procreate’s typography tools offer you a world of design opportunities. Create crisp vector text using professional-quality text editing features. Access a wide range of pre-loaded fonts, or even import your own favorites.
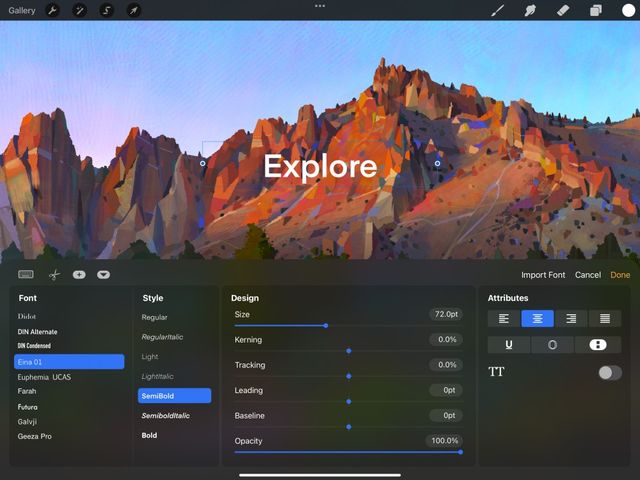
Tap the wrench button in the top left of the screen to open the Actions menu, then tap Add > Add text.
A Text box will be added to the canvas. You can drag the text box to move it, or begin typing immediately. Tap the Active Color to change the color of your text, or tap the Edit Style button to access a variety of fonts, design tools and editing options.
When you’re happy with your text, open the Layers panel , tap the thumbnail of your Text layer, and tap Rasterize. This converts your vector text to pixels. Now you can apply any of Procreate’s features and effects to it.
The Text section offers an in-depth exploration of this powerful and versatile feature.
Cut / Copy / Paste
Add, remove, and duplicate parts of your canvas from the Actions menu.
Cut a layer or selection.
This classic clipboard function will remove your selected area from your document and store it on the iOS clipboard. Paste it elsewhere in your canvas, into a different Procreate canvas, or into another app on you iPad.
Copy a layer or selection.
Copy works the same way as Cut, without removing the selection from the original document.
Copy your entire canvas.
Copy and Cut only affect a single layer. Copy All will copy the content of every visible layer of your Canvas as a flattened image.
Drop your Cut or Copied image into another document or app.
Once you’ve Cut or Copied your image data, Paste it elsewhere in your current canvas, or into another canvas. You can even paste into emails, chats, and other compatible apps.
Pro Tip
Procreate offers two other ways to access Copy Paste without going through the Actions menu. You can set up and access Copy Paste options via QuickMenu , or call up the Copy Paste menu with a single gesture.
Sorry. We’re having trouble copying to your clipboard.
Try directly copying the link below.
Still have questions?
If you didn't find what you're looking for, explore our video resources on YouTube or contact us directly. We’re always happy to help.
