Procreate Handbook
Sorry. We’re having trouble copying to your clipboard.
Try directly copying the link below.
Canvas
Make sweeping changes to your canvas from one simple menu. Crop, Resize and Flip, engage the power of Animation Assist and add Drawing Guides. You can even access detailed technical information about your artwork.
Crop and Resize
Tweak the size and shape of your canvas to create the perfect composition.
To make your canvas larger, smaller, or a different shape, tap Actions > Canvas > Crop and Resize.
This will bring up the Crop and Resize interface, which adds a grid overlay to your image. The edges of this box represent the new edges of your canvas. You can adjust it in various ways.
Introduce a whole new angle to your artwork with Rotate.
Use the Rotation slider in the bottom toolbar to adjust the angle of your current canvas relative to the crop area.
Drag the boundaries of the grid overlay to crop or enlarge your canvas.
Stretch or squash your canvas size along one axis by dragging one side of the overlay.
To adjust the canvas size on both horizontal and vertical axis at the same time, drag a corner point.
The numerical width and height readouts in the bottom toolbar update as you adjust the crop overlay.
A readout in the notification bar will track how many layers your new canvas size can offer. Due to hardware limitations, you won’t be able to drag the grid out past the maximum possible canvas size.
Lock your aspect ratio to uniformly crop or enlarge your canvas.
The Aspect Lock is the chainlink button between the numerical width and height readouts. Tap this to lock the ratio of your image width to height. This locks the canvas shape - so, for example, a square canvas remains square no matter what size you make it.
Enter numerical dimensions to precisely crop or enlarge your canvas.
The bottom toolbar includes numerical readouts that display the width and height of your canvas. These will be in the measurement unit you set when you created you document. For example, if you set your original canvas size in inches, the readout will also be in inches.
Tap the width or height readout to invoke the iOS keypad, and type in your numerical value for that axis. If the Aspect Lock is active, the other axis will change to keep your canvas' ratio.
If you’re using drag to resize, you’ll see these readouts update live as you change the crop overlay.
Set or change the DPI of your image.
To set or change the DPI of your canvas Tap Actions > Canvas > Crop and Resize then enter the DPI you want.
DPI (dots per inch) is a print resolution measurement. DPI tells you how many pixels are in each inch of your canvas. More pixels means more capacity for detail in your image, and higher-quality printing.
The standard DPI for printing is 300DPI. If you are planning on printing your artwork, and want the print to reproduce well, set your DPI to a minimum 300.
The standard DPI for screens is 72-144DPI. If you are wanting to share your work so someone can view it on-screen clearly, set your DPI between 72-144.
Be aware that changing your DPI setting will alter the physical size of your canvas in millimeters, centimeters and inches. It will not alter the pixel size.
Scale your entire image up or down with the power of Resample.
To make your canvas larger, smaller, or a different shape, tap Actions > Canvas > Crop and Resize. Toggle the Resample switch on to begin resizing your content.
When you toggle Resample on, the Aspect Lock is automatically engaged. It will preserve the aspect ratio (relative width and height) as you resize your canvas.
If you’d like to change the aspect ratio of your canvas when resizing, adjust the crop overlay before you switch on Resample.
With Resample switched on, adjusting the size of the crop overlay doesn't change the dimension readouts. Instead, the numerical dimensions you enter set the canvas area. This will enlarge or shrink your canvas to fit your chosen numerical dimensions.
If you need to change your image dimensions, tap a number to bring up the iOS keypad. Type in your new size. The area inside the overlay will automatically grow or shrink to fit that size.
You can use this to change the composition of your piece without changing the overall dimensions of the canvas. For example, by zooming in on a part you like.
Pro Tip
When you resample an image, Procreate enlarges or shrinks it using bicubic interpolation. When resampling scales a digital image up, it creates new data from existing pixels. This can create unexpected results.
Snapping in Crop & Resize automatically occurs when you Tap Actions > Canvas > Crop & Resize.
The edges of the grid overlay automatically snap to the edges, or the horizontal and vertical centre points of your canvas. This helps perform more precise cropping and resizing of your artwork or canvas.
The edges of the grid overlay also automatically snap to the edges of any artwork within your canvas. This allows you to accurately crop to the edge of an image.
Animation Assist
An interface that has everything you need to create stunning animations and motion graphics.
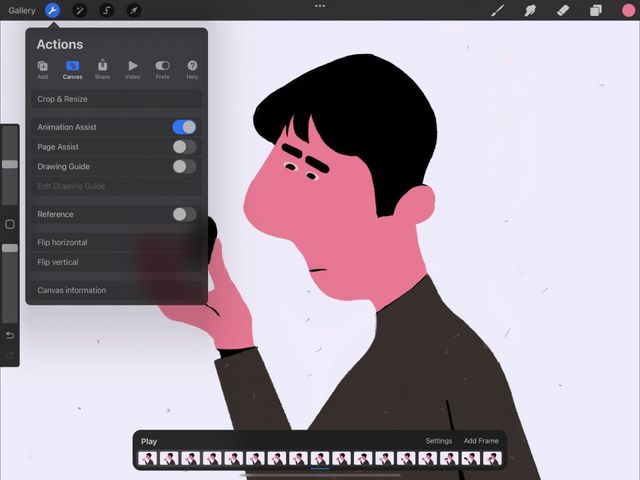

Procreate’s Animation Assist is all you need to breathe life into your art. Offering a visual Timeline of your animation, onion-skinning to help you see where you’re going and where you’ve been plus Play/Pause controls. Animation Assist gives you powerful options to help you get the most out of your motion graphics,
Tap the wrench button in the top left of the screen to open the Actions menu. Tap Canvas, and flip the Animation Assist switch.
Animation Assist is now activated.
Discover what Animation Assist's robust features can help you achieve.
Page Assist
An interface that transforms Procreate from a single canvas art app into a sketchbook with multiple pages.
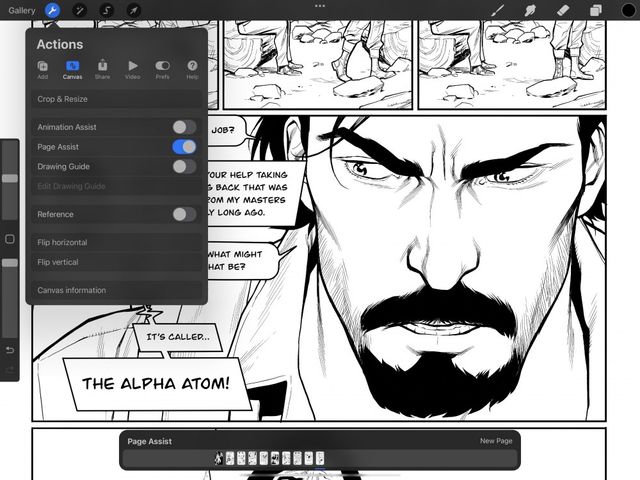

Page Assist turns individual layers into the digital pages of a book with a visual Timeline. Ideal for ideation and sketching, creating comics, storyboards or keeping a visual diary, Page Assist can also open imported multi-page PDFs to flip through and mark up using all the tools available in Procreate.
Tap the wrench button in the top left of the screen to open the Actions menu. Tap Canvas, and flip the Page Assist switch.
Page Assist is now activated.
Find out more and how to get the most out of this handy feature in the Page Assist section of this handbook.
Drawing Guide
Add a visual guide to your canvas to help you build realistic environments and objects
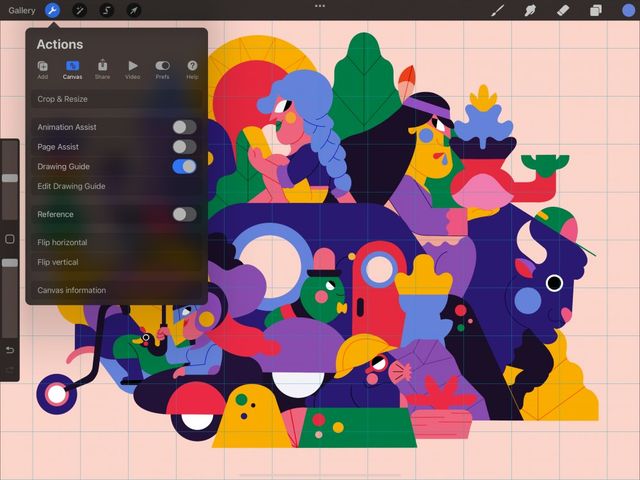

Procreate’s array of Drawing Guides free you to focus on the big picture. Enjoy precise 2D Grids, snappy Drawing Assist, powerful Perspective and mind-bending Symmetry.
Tap the wrench button in the top left of the screen to open the Actions menu. Tap Canvas, and flip the Drawing Guide switch.
Your Drawing Guide is now activated.
The Drawing Guides section offers an in-depth exploration of this powerful and versatile feature.
Reference Companion
Add a floating window above your work that references your canvas. Reference Companion also lets you see your face in real-time while you work in FacePaint.
To activate the Reference Companion window Tap Actions > Canvas > Reference toggle. The window will appear on top of your canvas.
Move the Reference Companion anywhere on your canvas by dragging with the handle at the top of the window.
Touch and drag the bottom right or left hand corner of the window to resize Reference Companion. You can pinch-zoom and pan the image inside the Reference Companion window. This works the exact same way as zooming and panning on your canvas.
At the bottom Reference Companion window are three buttons for Canvas, Image and Face reference.
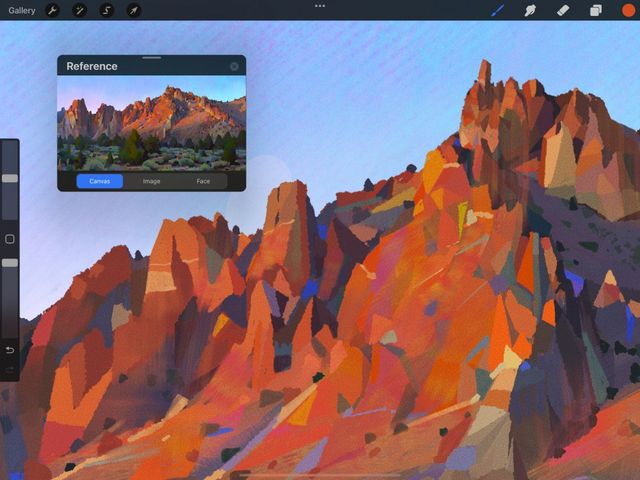
Reference Canvas
View your entire canvas while working. Zoom in on a detail, or view another part of your artwork while you draw.
Canvas is the default when you open the Reference Companion. Canvas shows you a reference image of your entire canvas and updates live as you draw.
Zoom and pan to view detail while you work. You can also use the Eyedropper to color pick anywhere from within the Reference Canvas.
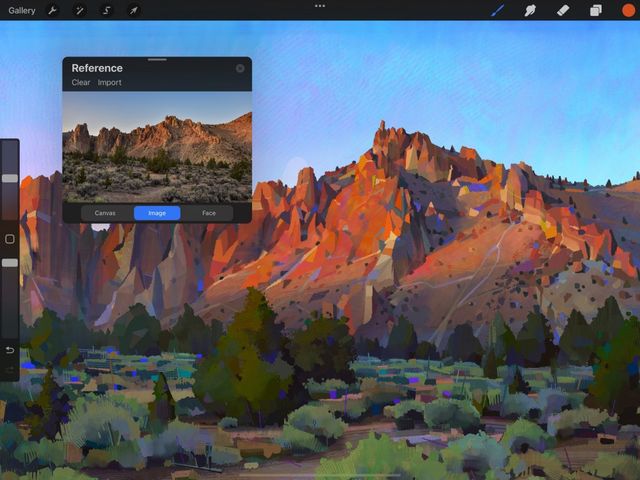
Reference Image
Use an image for reference without the need to split screen or using a layer as reference.
Many artists use an image or photo on their canvas as reference while they work. The Image button allows you to import an image from the Photos app to use as a Reference Image instead.
Zoom and pan to view detail while you work. You can also use the Eyedropper to color pick anywhere from within the Reference Canvas.
Pro Tip
Tap the Reference Companion window to hide the UI. This gives you more space to view your Reference Canvas or Image. When you need to use the UI, Tap the window again to reveal.
If you have a compatible iPad, your Reference Companion will also feature a Face button that will activate FacePaint. Compatible iPads that are:
iPad Pro 12.9" 2018 and 2020
iPad Pro 11” 2018 and 2020
iPad Air 3 and 4 or mini 5 running iPadOS 14
iPad 8th gen running iPadOS 14
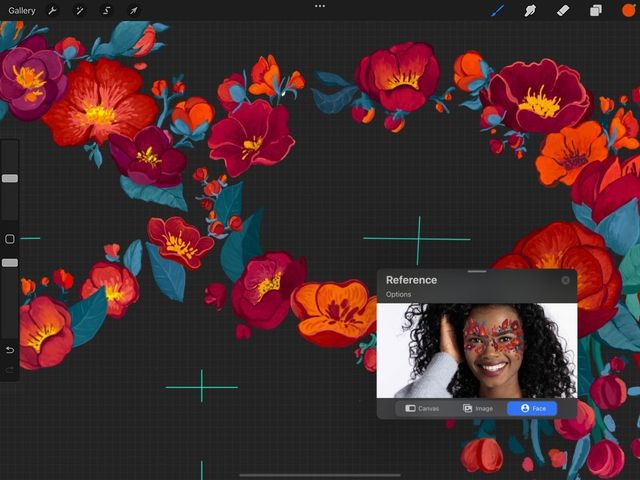
Reference Face
Paint on your face using Reference Companion and AR.
The Face button activates FacePaint and the forward facing camera of your iPad. Using AR technology, FacePaint maps whatever is on your canvas onto your face in real time.
The Face reference works in conjunction with FacePaint and a custom FacePaint canvas.
Find out more about FacePaint below.
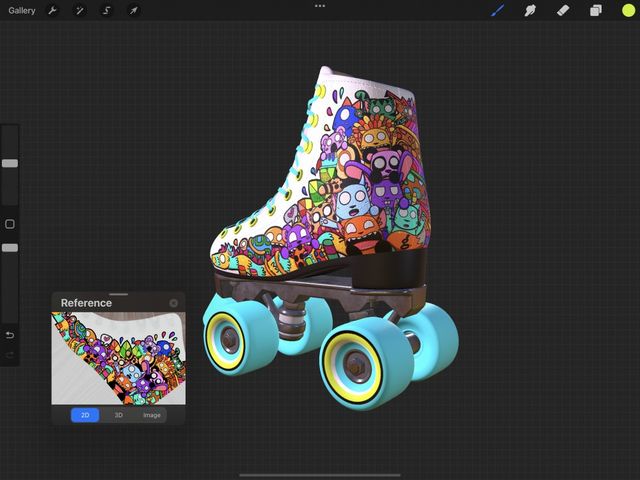
Reference 3D
The Reference companion has three different views to help you stay on your 3D canvas and painting.
To turn on the Reference companion tap Actions > Canvas > Reference toggle on.
Find out more about 3D Reference companion and how it works in Interface & Gestures in the 3D Painting section of this Handbook.
FacePaint
Use Procreate’s FacePaint and AR to create interactive masks, makeup and more.
Creating in FacePaint
To start FacePaint, go to Gallery and hit + to create a new Canvas. Tap FacePaint from the list of canvas presets and a blank canvas will open with no layers. This will automatically activate the FacePaint Companion.
You can also activate FacePaint by tapping Actions > Canvas > Reference toggle to open the Reference Companion. Tap the Face button on the Reference Companion window. You will a see video captured from your iPad’s front facing camera in the Reference Companion window.
FacePaint works by wrapping a custom made FacePaint canvas to your face using AR. FacePaint displays four guides on your Canvas when the front facing camera detects a face. These guides represent the position of your eyes, nose and mouth. Use these for positioning while painting on the Canvas. Anything you paint on the Canvas will map to your face in the Reference Companion window.
Anything you can do in Procreate you can also do in FacePaint. This includes using layers, blend modes and all effects. Even Animation Assist works in FacePaint allowing you to bring your creations to life.
FacePaint is available on the following supported devices:
iPad Pro 12.9" 2018 and 2020
iPad Pro 11” 2018 and 2020
iPad Air 3 and 4 or mini 5 running iPadOS 14
iPad 8th gen running iPadOS 14
FacePaint Options
Share your FacePaint creations with the world. Export them as images or video from the Options menu.
FacePaint exports whatever displays in the Reference Companion window.
To take a photo, Tap Options > Take a Photo on the Reference Companion window. A timer counting down from 3 starts before taking the photo. This will save to your Camera and Photos app as a 3088x2320 72DPI .JPG
To capture a video, tap Options > Record a Video in the top left hand corner of the Reference Companion window. This will record whatever is in the Reference window to the Camera and Photos app as a 1080p H264 format MP4.
If you would like to turn off your front facing camera and only view your FacePaint art work against a blank background Tap Options > Camera. Initially this will display your FacePaint art work against a white background. You can change this by altering the color of the Background Layer at the bottom of your Layer’s list.
To view a full screen version of the what is in the Reference Companion window, tap Options > Full Screen. To return to your canvas with a Reference Companion window, tap Options > Full Screen again.
Flip Canvas
Flip your canvas to see your art with fresh eyes.
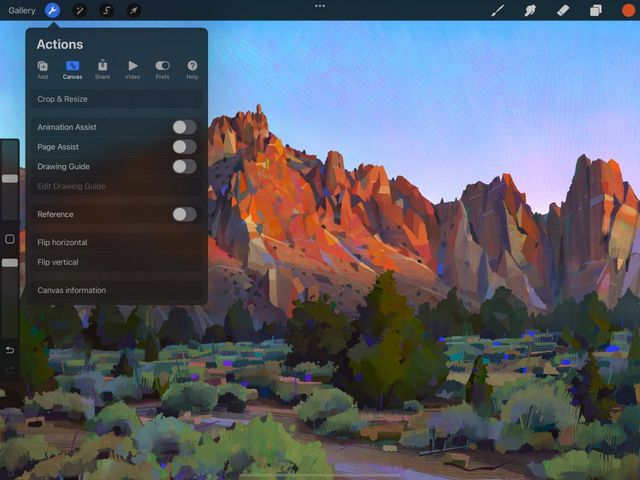

Tap Actions > Canvas > Flip canvas horizontally or Flip canvas vertically.
Your canvas will flip along the horizontal (side to side) or vertical (up and down) axis.
You can also flip your canvas from the QuickMenu .
Pro Tip
Flipping your canvas horizontally is a great way to reveal composition and proportions issues. Many experienced artists use this technique to check their work.
Canvas Information
View comprehensive technical information about your artwork.
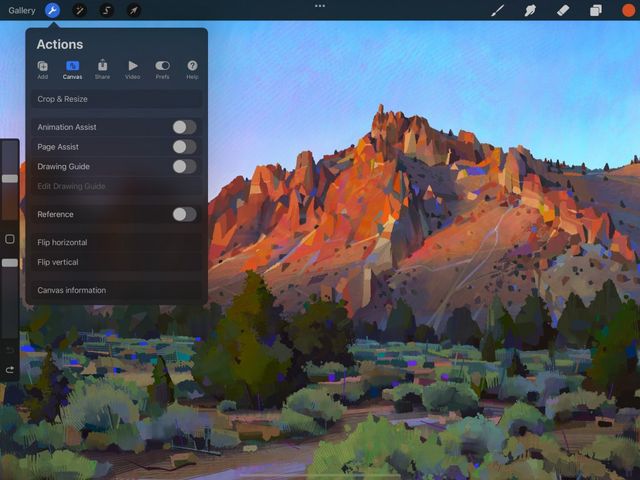

Tap Actions > Canvas > Canvas information.
This will bring up the Canvas Information screen. It is divided into the following sections:
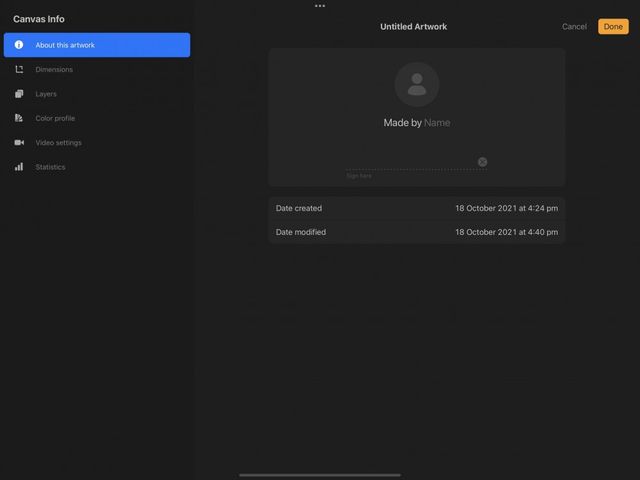
About this artwork
You can now ‘sign’ your artwork with your name, a handwritten signature, and a profile picture. This information embeds in your .procreate file , Anyone who opens your image in Procreate will see your credit in Canvas Information.
Artwork Title
Change your artwork title without returning to the Gallery. Tap on the artwork title to bring up the iOS keyboard. Enter a new name and tap the return key.
Profile picture
Tap the ‘person’ icon to bring up Image Source options. From Camera allows you to snap a photo of yourself using the iPad camera. Or, choose From Photos to load an image from your camera roll.
Made by Name
Tap the greyed-out word Name in Made by Name to bring up the iOS keyboard and add your name to your creation.
Signature
Sign your name on the dotted line using Pencil or finger. If you need to start again, tap the (x) icon to clear the field.
Date Created
The canvas creation date and time.
Date Modified
The date and time this canvas was last modified on this device.
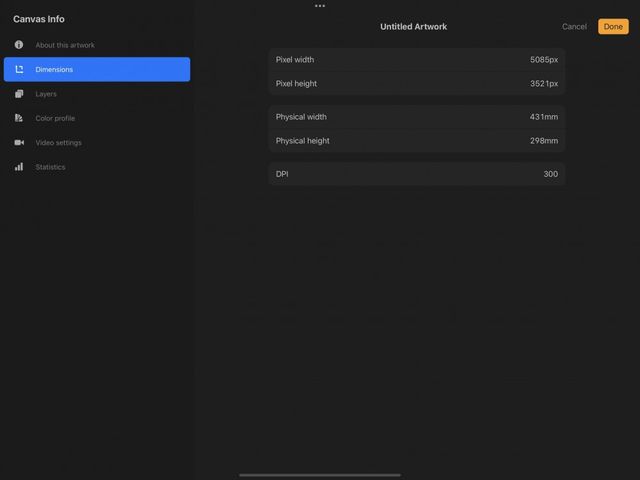
Dimensions
Pixel width / Pixel height
The width and height of your canvas in pixels. Creating a canvas with a physical measurement, like millimeters or inches, will calculate a physical dimensions combined with DPI.
Physical width / Physical height
The width and height of your canvas shown in the unit of measurement you chose when you created it. Creating a canvas in pixels will calculate pixel dimensions combined with DPI. Procreate uses your geographical region to determine a default physical unit of measurement.
DPI
Also known as print resolution, DPI (dots per inch) tells you how many pixels are in each inch of your canvas. More pixels means more capacity for detail in your image, and higher-quality printing.
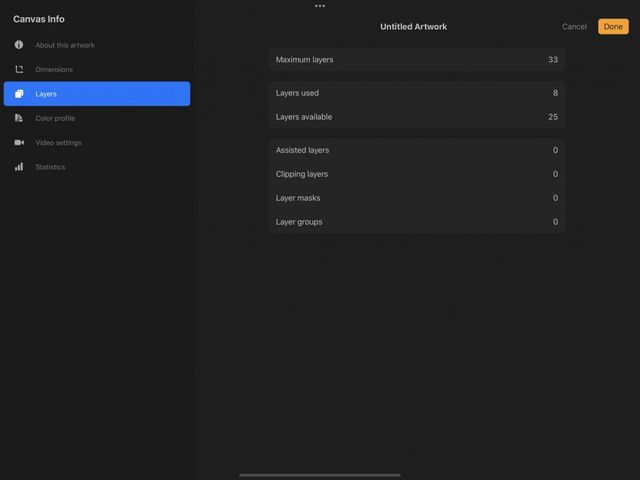
Layers
Maximum layers
The highest number of layers you can have in this canvas.
Layers used
How many layers currently exist in this canvas.
Layers available
How many more layers you can add to this canvas. (Layers available equals Maximum layers minus Layers used.)
Assisted / Clipping / masks / groups
These four categories show how many of the layers in your canvas currently use Drawing Assist, how many are set as Drawing Assist , how many are set as Clipping masks , and how many Layer masks and Layer groups exist in this document.
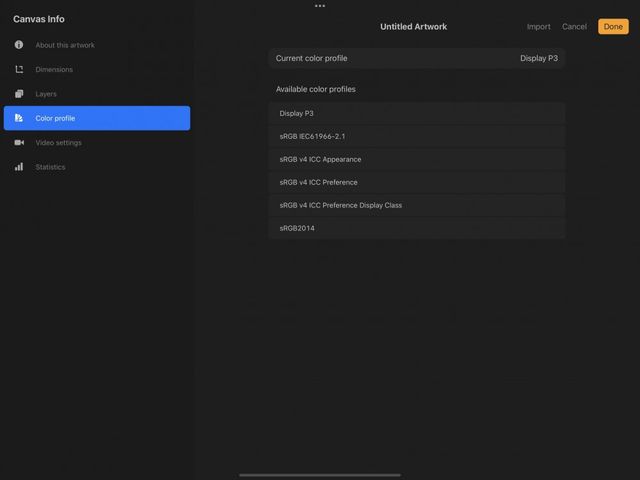
Color profile
Displays which color profile your document uses. This was set by you during canvas creation .
You can change the color profile of your artwork at anytime. Find out how to do this in Color - Profiles.
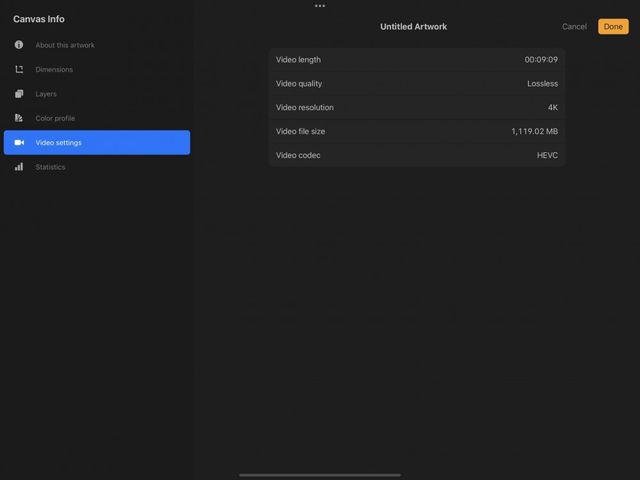
Video settings
Procreate can generate a Time-lapse video recording of your artistic process. You can then export to share this with the world.
Explore how to enable, disable, and adjust your Time-lapse video .
Video length
The running time of the Time-lapse video generated from this artwork.
Video quality
The quality setting of your Time-lapse video recording. Higher settings give you better visual quality, but also increase the size of your file. This means it will take up more digital storage space and be slower to upload and download.
Video resolution
As with image resolution, a higher resolution means your video includes more pixels. Higher-resolution videos look better on big screens. Higher-resolution will mean larger file sizes.
Video file size
This readout tells you the size of your Time-lapse video in megabytes. The length, quality settings, and resolution of the video affects its file size.
Video codec
A codec is the type of compression your video file uses. Learn more about it in Time-lapse Video .
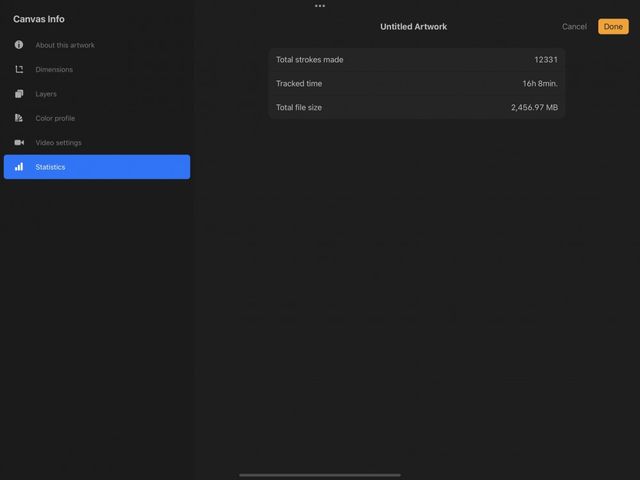
Statistics
Total strokes made
This tracks the number of individual strokes you’ve made in your current artwork.
Tracked time
This tracks how long your current artwork has been open for across multiple sessions.
Total file size
The size of your .procreate file, in megabytes.
Sorry. We’re having trouble copying to your clipboard.
Try directly copying the link below.
Still have questions?
If you didn't find what you're looking for, explore our video resources on YouTube or contact us directly. We’re always happy to help.

