Procreate Handbook
Sorry. We’re having trouble copying to your clipboard.
Try directly copying the link below.
Accessibility
Procreate has accessibility features to help make digital art more accessible to everyone.
Accessibility Features
Use the following features to get the most out of Procreate if you have dexterity or sight impairments.
Pro Tip
Some accessibility features might suit your work flow even if you don't usually have them enabled on your iPad. Try experimenting and you may find you prefer to leave certain features active.
Single Touch Gestures
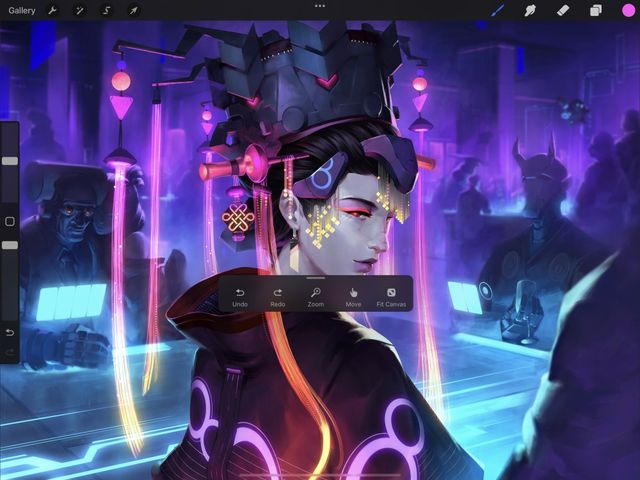
Use a single finger to undo, redo, zoom, move and rotate your canvas, as well as fitting to canvas all through the Single Touch Gestures Companion.
The Single Touch Gestures Companion is a small companion window that floats above your canvas when activated through the Procreate settings.

To find out how to activate the Single Touch Gestures Companion and use all the single touch gestures check out Gestures in the Interface & Gestures section of this Handbook.
VoiceOver
VoiceOver lets people with impaired vision get a lot more out of their iPad. Every time you touch your iPad, VoiceOver will tell you what you have pressed to navigate, read menus and more.
Procreate supports VoiceOver through iPadOS. To access VoiceOver go to your global iPadOS Settings > Accessibility and toggle VoiceOver on.
Note: You cannot draw while VoiceOver is active. You can set up a shortcut to quickly turn VoiceOver on and off. This will avoid needing to constantly return to global iPadOS Settings.
Set up a VoiceOver shortcut by going to iPadOS Settings > Accessibility > Accessibility Shortcut then select VoiceOver.
Triple click your power or home button to turn VoiceOver on or off.
You may have more than one Accessibility Shortcut set up. If this is this case, triple clicking the power or home button will invoke the Accessibility Shortcuts panel. Tap VoiceOver from the Accessibility Shortcuts menu to turn VoiceOver on or off.
Larger Accessibility Text
Procreate supports Dynamic Type for the vision impaired through iPadOS.
Accessibility Settings
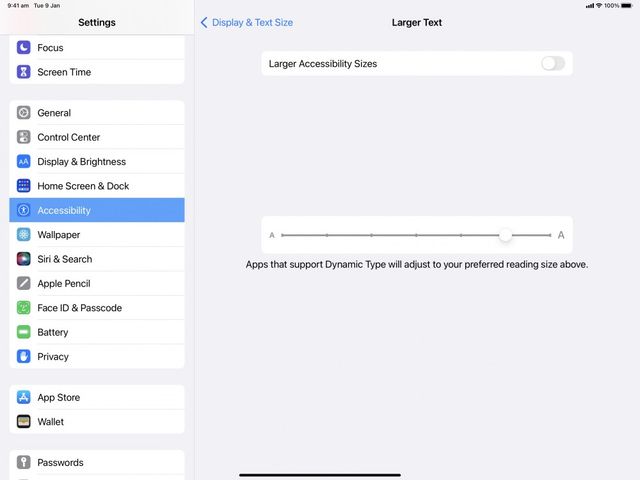
You can adjust Dynamic Type sizes through Accessibility in the global iPadOS Settings.
Tap iPadOS Settings > Accessibility > Display & Text Sizes > Larger Text. Then toggle Larger Accessibility Sizes on. Use the text size slider to set your preferred text size.
Apps that support Dynamic Type will now feature your preferred text size in their menus.

Pro Tip
Setting your Dynamic Type to 66% or higher can display smaller buttons in an easy-to-read pop-up panel. Tap and hold any small button not in the top navigation to invoke a large pop-up displaying that button’s icon and name.
Color Cards
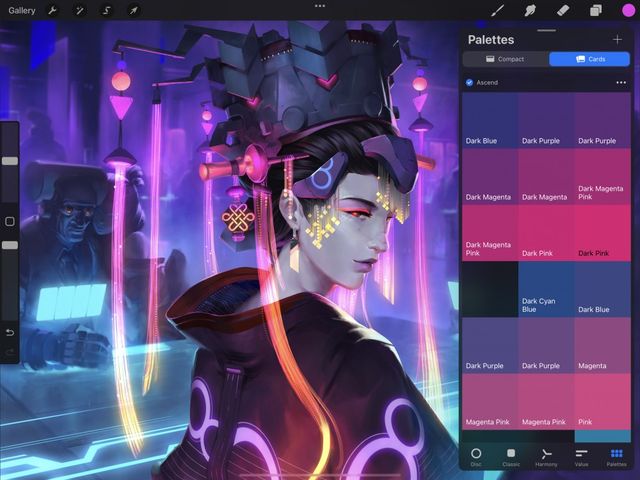
Color Cards display larger swatches in Palettes. They also display the color’s title on the swatch. Cards can help the vision impaired and color blind use color more easily in Procreate.

A full explanation of how Cards work can be found in Palettes in the Color section of this Handbook.
Color Description Notifications
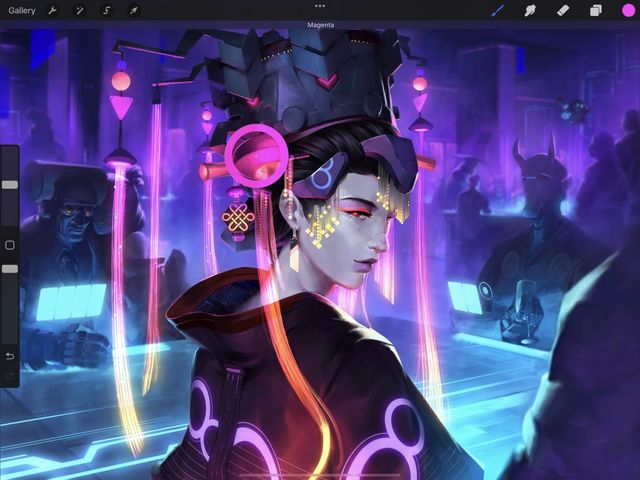
Color Description Notifications display the name of an Active Color each time it changes. This can aid the color blind to better identify certain shades and colors.
An Active Color’s name displays at the top of the screen when you use the Eyedropper or select a new Swatch in Palettes.
To turn on Color Description Notifications go to iPadOS Settings > Procreate and toggle Color Description Notifications on.


Feedback Sounds
Feedback sounds are various alert noises that activate when you perform certain functions. These can alert the vision impaired when a Procreate input has been correctly or incorrectly entered.
To turn on Feedback sounds go to iPadOS Settings > Procreate and toggle Feedback sounds on.
Tap Assistance - Initial Touch Location Support
Initial Touch Location Support is an iPad accessibility feature in the iPadOS Accessibility settings. Designed for people who experience tremors, it designates their first touch as the one iPad responds to, and not any subsequent touches that happen after their initial touch.
If you require Initial Touch Location Support to use your iPad, you must also activate Tap Assistance - Initial Touch Location Support in the Procreate iPad settings to use this feature in Procreate.
To do this go to iPadOS Settings > Procreate and toggle Tap Assistance - Initial Touch Location Support on.
Stroke Stabilization
Stabilization smooths out strokes as you draw them. This makes hand drawn lines straighter than they would naturally be. For people with tremors or hands that shake, turning these settings up can help achieve smoother, more intentional strokes.
Stabilization in Procreate can be applied globally, or to each individual brush. Global settings are best if you need constant stroke stabilization.
Global Stabilization Settings
The global setting for stabilization are found in the Pressure and Smoothing panel. To access these tap Actions > Preferences > Pressure & Smoothing.
Procreate has normal Stabilization, and a more advanced version called Motion Filtering.
Stabilization takes a moving average of a stroke and draws that on the canvas. The higher the Stabilization, the more it will average out the wobbles in a stroke. This will make strokes deliberately smoother and straighter.
Use the slider to set the percentage of Stabilization you prefer.
Stabilization is also dependent on the speed of your stroke. The faster you draw, the more it will try to smooth a stroke out.
NOTE: Stabilization can be useful for artists of all abilities. At lower levels it can help smooth the stokes of even the steadiest hand.
Motion Filtering is a new take on stabilization and uses more advanced algorithms. It’s designed specifically with hand tremors and accessibility in mind.
Stabilization averages out wobbles in a stroke by squashing them towards a central line. Motion Filtering deletes the extremities of a stroke’s wobbles entirely without squashing.
Use the slider to set the percentage of Motion Filtering you prefer.
This allows for smoother and straighter strokes no matter what speed lines are drawn at. This also means hand tremors will be less represented when making a stroke on the canvas.
Motion Filtering Expression only works when Motion Filtering is on. While Motion Filtering helps take the wobbles out of strokes, it can also make them too straight and smooth.
Motion Filtering Expression puts some expressive feeling back into strokes.
Use the slider to set the percentage of Motion Filtering Expression you prefer.
NOTE: The higher Motion Filtering is set, the less effect Motion Filter Expression can have on a stroke.
Tip Attachment works in conjunction with Motion Filtering and establishes the start point of your stroke.
Tip Attachment is on by default, however you can use the toggle to turn Tip Attachment on or off. When Tip Attachment is on, strokes begin and continue where the tip of a stroke starts and tracks on the canvas.
With Tip Attachment toggled off, the start point of a stroke is established by looking at multiple start points and finding an average between them. This can be useful for artists with tremors who can’t precisely control where the start of their stroke is laid down.
Pro Tip
You may want or need a combination of all the Stabilization features above to achieve the best ‘feel’ for you. Try testing combinations out on a blank canvas. Try different percentages and speeds to get a good feel for what works. This will help you figure out how much stroke stabilization you like, or need when working.
Brush Stabilization Settings
If you don’t require global stroke stabilization, these setting can also be assigned to individual brushes.
To find out how to set up stroke stabilization for brushes check out Stabilization in the Brush Studio Settings section of this Handbook.
Sorry. We’re having trouble copying to your clipboard.
Try directly copying the link below.
Still have questions?
If you didn't find what you're looking for, explore our video resources on YouTube or contact us directly. We’re always happy to help.
