Procreate Handbook
Sorry. We’re having trouble copying to your clipboard.
Try directly copying the link below.
Organize
Move, Lock, Duplicate and Delete layers. A touch or swipe puts all the most commonly-used layer controls at your fingertips.
Select Layers
Control and edit multiple layers at once, perform bulk moving, grouping, deletion or transformation. Procreate offers Primary and Secondary layers selection to give you finer control.
On the Layers panel, tap any layer to make it your Primary (active) layer.
Your Primary layer will appear in the Layer's panel as bright blue. You can only have one Primary layer at a time.
Any drawing or painting you do affects this Primary layer.
Pro Tip
Make sure you have the correct layer selected before you begin drawing or painting.
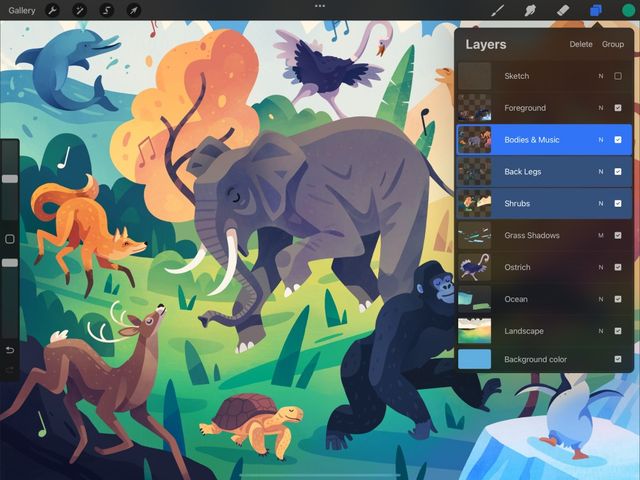
Swipe right on any layer to add it to your selection as a Secondary layer.
Your Secondary layers will appear in the Layer's panel as dark blue. While you can only have one Primary layer at a time, you can select as many Secondary layers as you like.
Drawing and painting will only appear on the Primary layer.
Using Selected Layers
Any Selection or Transformation actions will affect all selected layers.
It's important to note, you can't make Adjustments with multiple layers selected.
Cut and Copy actions only apply to your Primary layer.
Pro Tip
As soon as you’ve selected a Secondary layer, two new options appear on the top right of the Layers panel: Delete and Group. These options affect all currently selected layers.
Selecting Layers vs Selecting Contents
Procreate enables you to select entire layers (detailed above), or select all the pixels on a layer via the Layer Options Menu .
You can also select parts of a layer's contents using Selection Tools.
Explore these different approaches in greater detail in Selections.
Layer Select
Use this shortcut to select a specific layer by touching the content on the canvas without needing to use the Layers menu.
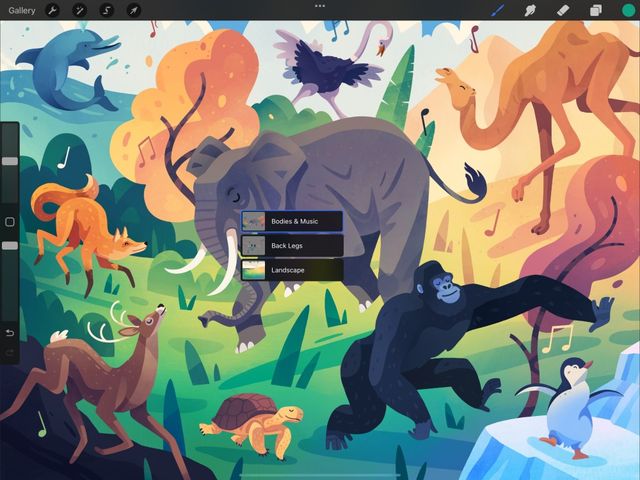

Layer Select uses touch to display all the layers associated within a specific area of the canvas. This extremely useful shortcut saves you needing to constantly access the Layers panel.
To turn on Layer Select, navigate to Actions > Prefs > Gesture Controls > Layer Select. Here you can set up touch and Pencil shortcuts to integrate Layer Select into your workflow.
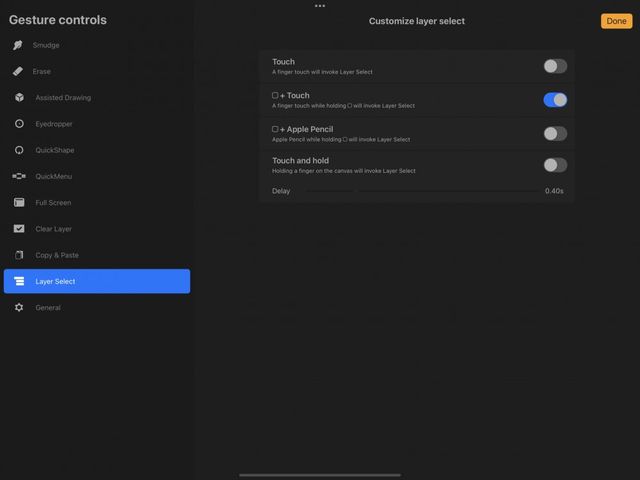
To find out more about Layer Select and other layer gesture controls, check out Layer Gestures in the Gestures section of Interface and Gestures in this handbook.
Group Layers
Combine multiple layers into Groups to keep your artwork tidy and organised.

Create
When you select multiple layers, you will see the Group option appear on the top right of the Layers panel.
Tap it to gather your selected layers into a Group.
View
Use the arrow at the right of the Group to expand or collapse the group at any time.
Select
Like layers, you can select a Group as a Primary or Secondary selection.
Swipe right to select a Secondary Group. This will behave the same as if you’d selected every layer in that Group.
Tap to select a Primary Group. This allows you to use all Selection and Transform actions. Actions apply to all the layers in a Group at once except for paint, smudge, erase, or using Adjustments.
Pro Tip
If you Paint, Smudge or Erase with a group selected in the Layers Panel, Layer Select will appear. Select a layer contained within that group to continue working.
Move
Drag and Drop layers, layer selections, and groups to reorganize elements within an artwork.


Move Layers and Layer Groups
Tap-and-hold a layer or Layer Group to pick it up. Now you can drag it up or down in the layer order. Release it to set the new order.
Move Primary and Secondary Layers
If you have selected Secondary layers (see below), moving the Primary layer will move all Secondary layers with it.
Move Layers Between Canvases
Drag and Drop layers from one canvas to another, or drop them in the Gallery to create new canvases.
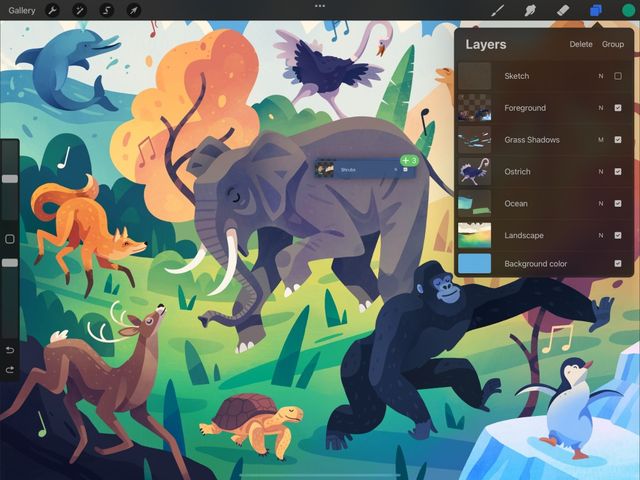


Tap-and-hold to pick up a layer, then tap other layers to pick them up as well. Tap the Gallery button with another finger.
Drop Layers to Create New Canvas
Dropping layers in the Gallery creates a new canvas for each layer you’re holding.
The canvas dimensions will be the same as the dimensions of your origin canvas.
Drop Layers to Add to Existing Canvas
While holding your layers in the Gallery, tap your destination canvas with another finger. Once the canvas loads, open the Layers panel, and drop your layers into the panel.
Layers imported by this method transfer as images, and will not keep Blend Modes, Masks, or other layer-specific data.
Pro Tip
You can also Share layers using this method.
Lock, Duplicate, and Delete Layers
Protect a completed layer from accidental edits with Lock. Reproduce an existing layer with Duplicate. Get rid of unwanted layers using Delete.
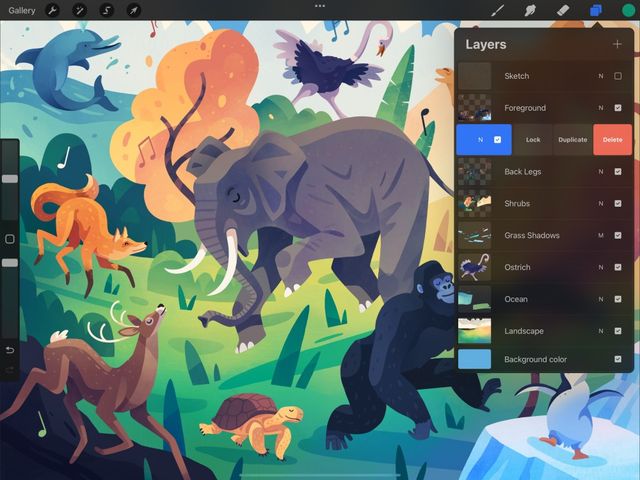

Swipe right-to-left on any layer or Layer Group to reveal buttons for these three commonly-used options.
Lock
This function prevents accidental editing a layer you want to remain untouched.
When you lock a layer, a small padlock symbol appears next to the layer name. To unlock a layer for editing, swipe right-to-left and tap Unlock.
Duplicate
When you Duplicate a layer or Layer Group, all Masks, Blend Modes and artwork will reproduce from the original.
Duplicating a layer is a great way to experiment with major changes without affecting the original.
Pro Tip
Procreate documents have a maximum number of layers that varies depending on your document size. If you reach the maximum, Merge layers to make room for new duplicates.
Delete
Deleting a layer removes that layer from your artwork.
You can Undo this action. But, once you have run out of undos, or if you leave or background the app, you won't be able to restore the layer or Group.
Pro Tip
You should generally think of deletion as permanent. Use with caution.
Sorry. We’re having trouble copying to your clipboard.
Try directly copying the link below.
Still have questions?
If you didn't find what you're looking for, explore our video resources on YouTube or contact us directly. We’re always happy to help.