Procreate ハンドブック
クリップボードにコピーができませんでした。
以下のリンクをコピーしてみてください。
Preferences
Customize Procreate to suit your workflow. Adjust the look of the interface, mirror your canvas to a connected screen, connect a third-party stylus, tweak the Pressure Curve, and personalize your Gesture Controls.
Interface Appearence
Tweak your Procreate interface to look the way you like it.

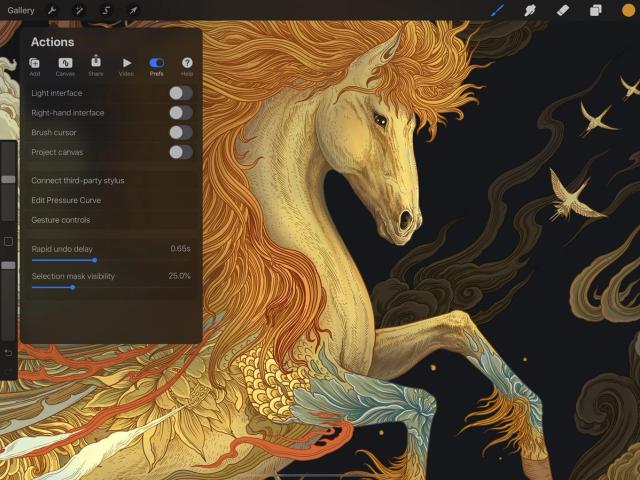
Go to Actions > Prefs and change the appearance and behaviour of the Procreate interface using a series of straightforward toggles and sliders.
Interface Toggles
These interface options can be toggled between states.
The Procreate interface offers two visual modes. Dark Mode is an unobtrusive charcoal interface that keeps the focus on your artwork. Light Mode is ideal for higher contrast when you’re working in bright environments.
By default, the sidebar is on the left-hand side of the screen. Toggle the Right-hand interface switch to move it to the other side of your canvas.
When you switch the Brush Cursor on, the outline of your Brush shape will appear when you touch the canvas so you can see in advance the shape of the mark you’ll make.
Connect a second display via cable or AirPlay and toggle Project Canvas. The second display will show your canvas only, full-screen - no interface, no zoom, and no interruptions. Work on fine details in Procreate while keeping an eye on the big picture.
Interface Sliders
These interface options use sliders for fine adjustments.
One of Procreate’s most powerful shortcuts is the two-finger hold for Rapid Undo. When you press and hold two fingers to the canvas, after a brief delay, Procreate will rapidly move back through Undo steps so you can quickly get rid of unwanted changes. This slider allows you to set the length of the delay before Rapid Undo is triggered, from no delay to 1.5 seconds.
When you commit a selection, it becomes a selection mask showing you which areas of the canvas are masked (not selected). These areas are represented by moving diagonal shading. The mask is semi-transparent by default. Adjusting the Selection mask visibility slider changes this transparency, making the mask more or less solid. If you have an active selection mask while you adjust the slider, you can see the change in real-time.
Pencil and Stylus Behavior
Finely adjust the way Procreate responds to your touch, Apple Pencil, or third-party stylus.
In Actions > Prefs, the set of three menu options in the middle of the panel control Procreate’s touch and pressure responses.
Connect any supported third-party stylus using Bluetooth.
Tap Connect third-party stylus to bring up the Connect Stylus panel. Here, you’ll find a list of the types of stylus Procreate currently supports.
プロの技
If you’re using an Apple Pencil, there’s no need to connect it - you can start drawing with it right away.
Ensuring that your stylus is switched on, tap on your stylus brand to scan for your device. When Procreate finds it, the Connect Stylus panel will update with options and readouts specific to your stylus.
You can assign your favorite functions to your stylus buttons as shortcuts, and track how much battery you have left. Options may vary from stylus to stylus.
Like the Apple Pencil, smart styluses interface with Procreate to dynamically change the opacity and thickness of your brush strokes depending on how hard you press - mimicking the way physical art tools respond to pressure.
Learn how to adjust Procreate’s overall Pressure Curve below. You can also edit pressure curves for individual brushes in the Brush Studio .
Tweak Procreate’s overall Pressure Curve to match your stylus sensitivity to the way you draw.
The Apple Pencil has a huge dynamic range, which means you have to press it down very hard to reach 100% pressure or opacity. Artists who draw with a lighter touch might find they’re not able to enjoy the full range of the Pencil’s sensitivity using these default settings.
To get the most out of the Apple Pencil, use Procreate’s customizable Pressure Curve to adjust the feel of your Pencil or stylus.
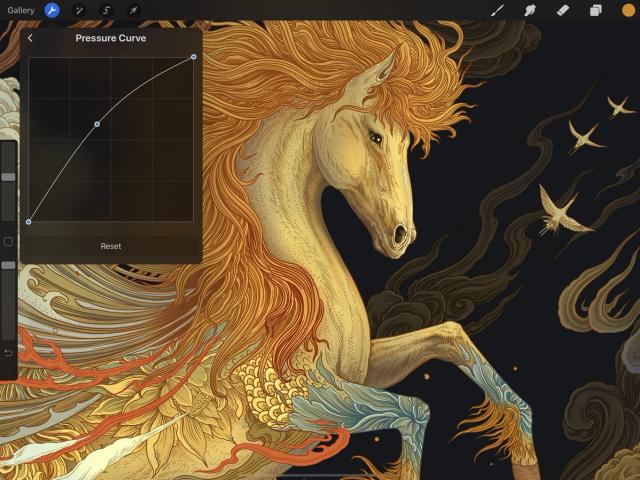
Tap Edit Pressure Curve to open the Pressure Curve panel.


The default curve is a straight diagonal line. Drag this line to move it as a smooth curve, or tap to add up to six handles.
The horizontal (side to side) axis of the graph defines pressure. Positioning the curve further to the left means your Pencil will respond more quickly to lighter pressure. Pushing the curve to the right means you will have to press the Pencil down harder to get a response.
The vertical (up and down) axis sets the value of the Pencil’s output. Maximum value (top) means the brush is producing 100% of its possible thickness or opacity. Moving toward the minimum value at the bottom means a thinner or more transparent stroke.
To remove a handle, tap it again. To undo all your changes and return to the default curve, tap Reset.
Gesture Controls
Modify and tweak Procreate’s array of gesture controls so it works the way you do.


Tap Actions > Prefs > Gesture Controls to open the Gesture Controls panel. This panel gives you the ability to modify shortcuts for a variety of tools throughout Procreate.
Most shortcuts can be toggled on or off. You can set up multiple shortcuts for the same function, or deactivate all shortcuts from functions you rarely use. Where a shortcut can be triggered by touch-and-hold, you can use a slider to set the delay before that shortcut triggers.
You cannot assign the same shortcut to two different features. If activating a shortcut on one feature causes a conflict with another feature that already uses the same shortcut, a yellow warning icon will flash up next to the conflicting feature.
プロの技
Some features, like QuickMenu , Layer Select , and Drawing Assist , aren’t enabled by default. Choose any gesture option in those sections of Gesture Controls to enable them.
To learn how to perform any of the gestures listed below, scroll to the Gesture Glossary at the bottom of this page.
Painting Gestures
These three features affect the way you draw, paint, smudge, and erase on the canvas.
Note: if you activate the Apple Pencil shortcut in any of these three categories, the tool you set as the Apple Pencil shortcut will override any other tool you choose when using the Apple Pencil.
If any of these options are active, paint strokes made with that method will always smudge, no matter which tool is selected.
Learn more about Smudge .
If any of these options are active, paint strokes made with that method will always erase, no matter which tool is selected.
Learn more about Erase .
The Tap Modify button and Apple Pencil double-tap options will toggle Drawing Assist on the current layer.
If any of the other options are active and a Drawing Guide exists, paint, smudge, and erase strokes made with that method will always be Assisted and snap to the guide, even if the current layer is not Assisted.
Learn more about Drawing Assist .
Advanced Feature Gestures
If you regularly need to sample color, draw perfect shapes, and quick-access multiple actions, it’s worth setting memorable shortcuts to these three powerful features.
Choose your favorite method to invoke the Eyedropper. On Tap Modify Button or Apple Pencil double-tap, the Eyedropper will invoke in the same place you last marked the canvas. From there you can drag it to your desired location. With all methods, the Eyedropper will dismiss as soon as you lift Pencil or finger from the canvas.
Learn more about Eyedropper .
Draw and Hold is the default method for QuickShape. Draw a stroke and keep your finger or pencil held to the canvas at the end to invoke QuickShape after a brief delay. All other methods will invoke QuickShape on the last stroke you made before triggering the shortcut.
Learn more about QuickShape .
When you invoke QuickMenu, you can dismiss it by tapping off, continuing to paint, or selecting one of the QuickMenu options.
プロの技
If you invoke QuickMenu by touching the canvas, leave your finger or Apple Pencil pressed down, and drag to instantly select a QuickMenu option. Once you grow familiar with the location of each item in your radial QuickMenu, you can perform this movement so quickly it becomes a simple flick in the right direction to trigger the option you need.
Learn more about QuickMenu .

Full Screen Gestures
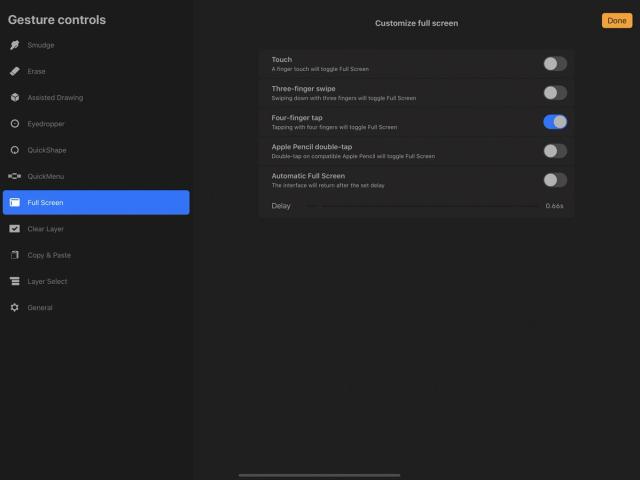
Set up a simple shortcut to toggle Full Screen mode, or set it to invoke and dismiss automatically.
Toggle
The first four shortcuts in the list will toggle Full Screen on and off. Trigger the action once, and it will invoke Full Screen. Trigger it again and it will dismiss Full Screen and return to the normal interface.
Automatic
If Automatic Full Screen is enabled, then the interface will automatically dismiss as soon as you start painting. Once you lift off the canvas, the interface will return after the set delay. Drag the slider to the left to decrease this delay, or to the right to increase it.
プロの技
When in Full Screen mode, you can always return to the interface by tapping the button in the top left corner.
Layer Content Gestures
Quickly clear, select, cut, copy, or paste content on your Layers.
Choose the best method to clear your layer. Clear Layer will delete all the content from your current Primary layer. You can use Undo to reverse this action.
The Scrub gesture is the default Clear Layer shortcut, and cannot be used to invoke any other feature.
You can also clear your layer from the Layer Options menu.
Learn more about Layers.
Select from a variety of options for invoking the Copy Paste menu. Once invoked, the Copy Paste menu will remain until you tap the canvas or select a menu option.
Learn more about Copy Paste .
Easily select layers without using the Layers menu, simply by touching their content on the canvas.
Once you’ve chosen a touch shortcut for Layer Select, invoke it, then hold and drag on the canvas. The Layer Select pop-up will appear. When you pause for a moment, the pop-up will expand to show the available layers visible in that location.
Once invoked and expanded, you can lift off the canvas and the Layer Select pop-up will remain until you tap off or select a layer.
Alternatively, before releasing the initial gesture you can drag toward one of the layers and release to instantly select it.
Learn more about Layers and Selections.
Gesture Options
Refine the way your gestures work with these general gesture controls.
Toggle on Disable Touch actions and from that point on, finger touches will only invoke gesture shortcuts. You will no longer be able to Paint, Smudge, Erase, or do anything other than use gesture shortcuts with your fingers.
This option switches off two-finger tap to Undo and three-finger tap to Redo.
This option controls whether the pinch-zoom gesture also allows rotation. It is on by default.
When you’ve finished with the Gesture Control panel, tap Done to return to your canvas.
Gesture Glossary
Learn how to perform all the gestures available in Gesture Controls.
Unless specified otherwise, gestures should be performed on the canvas area of the screen. Multiple gestures can sometimes be combined (for example, Hold Modify Button + Touch). All combinations are listed here.
Tap
An extremely brief touch with one finger.
Touch
Touch or draw with one finger.
Touch and Hold
Hold one finger down in place for a second or so.
Apple Pencil
Use the tip of the Apple Pencil to touch or draw on the canvas.
Apple Pencil double-tap
Quickly tap twice on the flat area on the side of the Apple Pencil (Second generation).
Tap Modify Button
Briefly touch the square button on the left-hand sidebar.
Hold Modify Button
Hold down the square button on the left-hand sidebar.
Modify Button + Apple Pencil
Hold down the square button on the left-hand sidebar while drawing on the canvas with the Apple Pencil.
Modify Button + Touch
Touch the canvas with one finger while holding down the square button on the left-hand sidebar with another finger.
Draw and Hold
Draw with a finger or pencil and hold at the end of the stroke to turn your hand-drawn shape into a perfect shape. (Gesture used for QuickShape only)
Scrub
Brush three fingers back and forth on the canvas to clear the layer. (Gesture used for Clear Layer only)
Three-finger Swipe
Brush downwards on the canvas with three fingers.
Four-finger Tap
Tap with four fingers at once.
クリップボードにコピーができませんでした。
以下のリンクをコピーしてみてください。
お探しのものが見つかりませんか?
探しているものが見つからない場合は、YouTube動画のリソースを検索するか、直接お問い合わせください。いつでも喜んでお手伝いさせていただきます。


