Procreate ハンドブック
クリップボードにコピーができませんでした。
以下のリンクをコピーしてみてください。
Share
With options to share your layers as bulk-exported individual images, multi-page PDF documents, and simple looping animations, your artworks are more versatile than ever before.
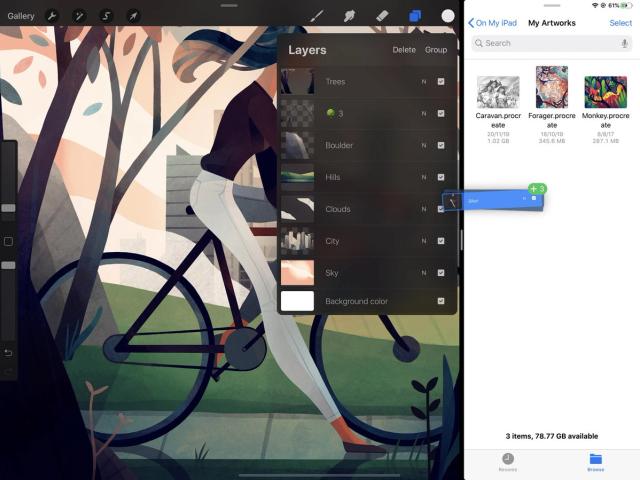
Drag-and-Drop Export
Export individual layers without leaving your canvas.


Pick up a layer and drag it to any compatible location to export it as an image. You can export to other Procreate documents, other apps, and any Apple sharing locations such as folders in iCloud or Files.
Bulk export layers by picking up one layer, then tapping others to add them to the stack. You can then Drag and Drop the stack the same way you would a single layer.
Share Layers
Export layers from a single artwork to a multi-page PDF, a folder of PNGs, or as frames of an animated GIF, PNG, or MP4.
Tap Actions > Share. Under the Share Layers section of the Share menu, you’ll find a complete list of layer export formats.
Only visible layers will be exported.
プロの技
If you held down the Visibility Checkbox to view a layer in isolation, all the layers that were visible before this view was triggered will be exported.
Export all the layers from your artwork to a PDF document.
Tap Actions > Share > PDF, then choose from Good, Better, or Best quality. Select a destination for your file.
Each layer becomes a page in the PDF, with the bottom layer the first page, and the top layer the last.
Bulk export all the layers from your artwork to a batch of PNG files.
Tap Actions > Share > PNG Files, then choose from Good, Better, or Best quality. Select a destination for your file.
Each PNG will be assigned a filename formed of the artwork name plus a sequential number. For example, if your artwork is called Masterpiece, your PNG files will be named Masterpiece-1, Masterpiece-2, and so on, with the bottom layer saved as the first file.
Tap the Export button in the top right to export your artwork, or tap Cancel to return to your canvas.
Export all the layers from your artwork to an animated GIF.
Tap Actions > Share > Animated GIF to open the Animated GIF interface.
Choose between Max Resolution (better quality, larger file size) or Web Ready (lower quality, smaller file size). Animated GIFs loop by default.
Each layer becomes a frame in the animated GIF, with the bottom layer appearing first.
Use the Frames per second slider to adjust the speed of your animation. You can also add dithering, use a per-frame color palette, and set a transparent background.
Tap the Export button in the top right to export your artwork, or tap Cancel to return to your canvas.
Export all the layers from your artwork to an animated PNG.
Animated PNGs offer a higher visual quality than animated GIFs, but are not yet supported everywhere.
Tap Actions > Share > Animated PNG to open the Animated PNG interface.
Choose between Max Resolution (better quality, larger file size) or Web Ready (lower quality, smaller file size). Animated PNGs loop by default.
Each layer becomes a frame in the animated PNG, with the bottom layer appearing first.
Use the Frames per second slider to adjust the speed of your animation. You can also set a transparent background.
Tap the Export button in the top right to export your artwork, or tap Cancel to return to your canvas.
Export all the layers from your artwork to an animated MP4.
Animated MP4s offer similar functionality to animated GIFs and PNGs, but as they use JPEG encoding for each frame, they cannot have transparent backgrounds. Their file size tends to be smaller.
Tap Actions > Share > Animated MP4 to open the Animated MP4 interface.
Choose between Max Resolution (better quality, larger file size) or Web Ready (lower quality, smaller file size). Animated MP4s loop by default.
Each layer becomes a frame in the animated MP4, with the bottom layer appearing first.
Use the Frames per second slider to adjust the speed of your animation.
Tap the Export button in the top right to export your artwork, or tap Cancel to return to your canvas.
クリップボードにコピーができませんでした。
以下のリンクをコピーしてみてください。
お探しのものが見つかりませんか?
探しているものが見つからない場合は、YouTube動画のリソースを検索するか、直接お問い合わせください。いつでも喜んでお手伝いさせていただきます。
