Procreate ハンドブック
クリップボードにコピーができませんでした。
以下のリンクをコピーしてみてください。
Brush Studio
Offering a breathtaking range of customization options, the Brush Studio guarantees your brushes will be as unique as your art.
Overview
Brush Studio offers Settings for existing brushes along with the ability to create your own brand new brushes. Tweak the basics, or dive deep to discover a versatile range of effects.
There are two ways to approach Brush Studio. You can dive in knowing what you want to create, and tweak settings until you reach your goal. Or you can play, using experimentation, serendipity and exploration to build something that feels good.
Tap the Brush button to open the Brush Library, and tap the + button on the top right to enter the Brush Studio.
プロの技
You can enter the Brush Studio in two ways: tap an existing brush to edit it, or tapping the + button to create a new brush. Both options take you to the same Brush Studio interface, with just one difference: the Import button is only available when you enter the Brush Studio using the + button.
Interface
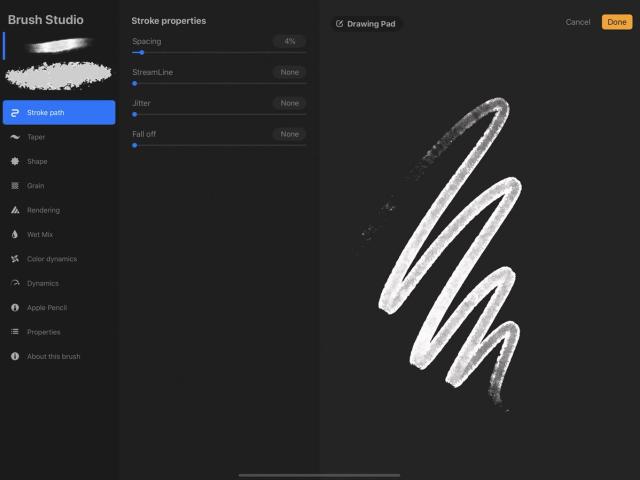
The Brush Studio interface is divided into three parts: Attributes, Settings, and Drawing Pad.
Tap any attribute in the left-hand menu to tweak settings for that attribute, and see the result update live in the Drawing Pad.
Each of these eleven aspects of your brush can be adjusted with a wide range of settings.
The leftmost menu in Brush Studio displays the eleven attributes you can modify to make your brush unique.
You can adjust the shape and grain of your brushes, tweak the appearance of your brush Stroke Path, and adjust how Procreate renders the end result. Play with Dynamics to set how your brush responds to speed and how colors shift in response to input from the Apple Pencil. Add Wet Mix to change the way your brush moves pigment around the canvas. Tweak the behavior of the Apple Pencil, set limits on your Brush Properties, and sign your creation.
These attributes are explored in detail below.
Adjust multiple brush attributes in each Settings category with sliders, toggles, and other simple controls.
When you select an attribute from the left menu, you’ll find a menu of adjustable settings for it. The available settings are different for each attribute, and are covered in detail in Brush Studio Settings .
Sliders: Numerical Adjustments
Every slider in Brush Studio can also be adjusted numerically for greater control. Tap the numerical value of a slider to type in the precise number you need.
Sliders: Tilt and Pressure Adjustments
When you tap on the numerical value next to a slider, some will allow you to attach Tilt and/or Pressure to that individual slider independently, offering extreme control over the behavior of that brush.
Preview your brush in the Drawing Pad to see your changes in action without leaving the Brush Studio.
The Drawing Pad is a preview window for your brushes. Like a notepad you might keep at hand to test the color of your markers, it sits inside the Brush Studio to give you a place to preview and test your brush changes. Draw shapes and scribbles into it to see how your brush responds. As you change various settings, the scribbles in the Drawing Pad update to show how your latest changes affect your brush.
In this way, you can test your brushes without leaving the Brush Studio or interrupting your creative flow.
To clear the Drawing Pad, scrub it with three fingers, or tap the button in Drawing Pad Settings.
Drawing Pad Settings
Tap on the icon of a square-and-pencil at the top left of the Drawing Pad to bring up Settings. Here, you can Clear Drawing Pad, Reset all Brush Settings (this applies only to the current brush), change the Preview Size of your brush to see it make larger or smaller strokes, and select from a range of preview colors for your brush by tapping one of the eight colored circles.
How Brushes Work
Read a brief overview of how Procreate brushes work to better understand what each attribute controls.
A Procreate brush is formed of a Shape containing a Grain (texture). When you draw a stroke with that brush, you are dragging that shape and the texture within it along a pathway.
You can set a Taper on that pathway so that your strokes start thin, reach full thickness, then taper off thin again as you finish the stroke, mimicking the behaviour of physical brushes and pencils.
Change the Rendering to manage how glazed or blended your brushstrokes appear.
Add Wet Mix attributes to mimic the behaviours of wet media like paints: you can adjust how much paint is loaded onto your brush and how it mixes into or drags through pigment when it comes into contact with other areas of color.
Color Dynamics let you create color effects only achievable in digital media: make a brush that can change color randomly, or shift through different hue, saturation or brightness based on the pressure and tilt of your Apple Pencil.
With Dynamics you can set your brush to respond to speed, or introduce an element of randomness using jitter.
Delve into the Apple Pencil settings to adjust the fundamentals of how the Pencil uses pressure and tilt to interact with brushes.
Set limits on brush behaviour and how your brushes look in the Library using Properties, and sign your new creation with About this Brush.
プロの技
At times you may adjust a setting and find that nothing seems to change in your brush. Try tweaking other settings, especially those immediately around it, as sometimes one setting may cancel out another.
Dive deep into the eleven attributes of Procreate brushes and their settings in Brush Studio Settings .
クリップボードにコピーができませんでした。
以下のリンクをコピーしてみてください。
お探しのものが見つかりませんか?
探しているものが見つからない場合は、YouTube動画のリソースを検索するか、直接お問い合わせください。いつでも喜んでお手伝いさせていただきます。
