Procreate ハンドブック
クリップボードにコピーができませんでした。
以下のリンクをコピーしてみてください。
Brush Library
Edit, organise, share and explore the wealth of versatile brushes built into Procreate.
Interface
Organized into themed categories, the Brush Library offers hundreds of brushes and endless scope for artistic experimentation.
Brush Button
Shaped like a paintbrush, the Brush button sits in the top right menu bar of the Procreate interface. Tap it once to activate the Brush tool, and tap it again to bring up the Brush Library.
プロの技
You can also bring up the Brush Library by tapping the Smudge or Erase tools, but when exploring what the brushes can do, painting with them is the best way to observe their effects.
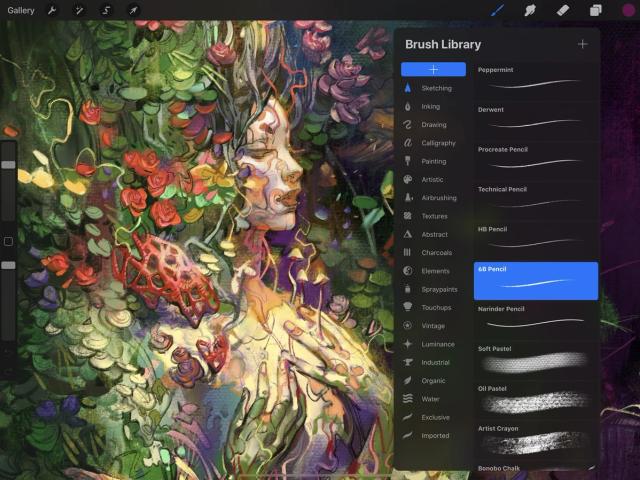
The left panel of the Brush Library lists the default Brush Sets sorted by medium and style.
Scroll the list to navigate all the Brush Sets, and tap a Set to view the brushes it contains on the right. When a Brush Set is selected, its icon will light up blue.
The right panel of the Brush Library lists all the individual brushes available in the currently selected Brush Set.
Tap a Brush Set to browse the brushes it contains. The brush list displays the name of each brush and a preview of the stroke it makes. Scroll the list to navigate, tap a brush to select it, then tap on the canvas to begin painting.
Tweak the settings for your brush or build a new brush from the ground up.
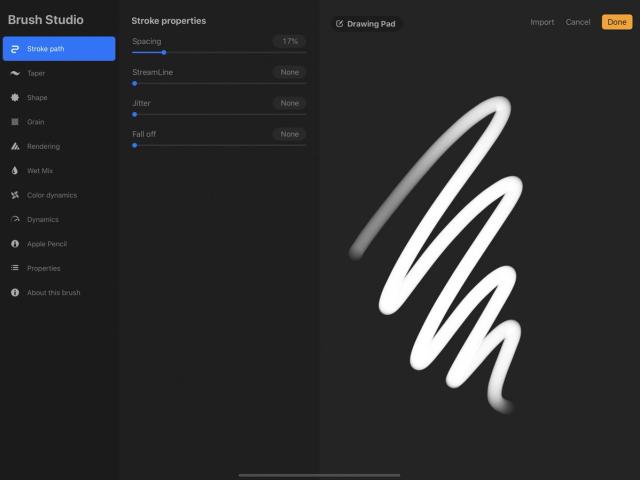
The Brush Studio is where you'll find all the settings to adjust existing brushes and create new ones. There are two ways to access it. Tap the + button at the top right of the Brush Library to begin making a new brush, or tap on your selected brush to begin editing existing settings.
The Brush Studio offers you total control over every aspect of your brush: the shape, grain, behaviour, colour, responsiveness, opacity, taper, and so much more. With hundreds of settings on offer, you can create limitless combinations. Or, start from scratch and build truly original tools to suit the way you work.
Learn more about changing settings and designing brushes in Brush Studio .
プロの技
Procreate remembers your settings so you can switch between multiple brushes without losing the adjustments you’ve made to them along the way.
Brush Set Categories
Discover the 18 versatile and intricately-crafted brush sets that form the core of Procreate’s Brush Library - there’s something to suit every style.
Some of Procreate’s brushes are realistic. Some are fantastical. The idea behind these brushes is to give you a range of tools from the practical to the experimental, playing on the strengths of digital art to do the impossible, rather than trying to mimic only what already exists.
Each Brush Set is summarised below. Experiment with the different brushes to explore the wide variety of effects you can achieve.
Sketching
Designed for practical drawing, planning, sketching and quick studies, these brushes mimic graphite pencils, technical pencils, pastels and artist crayons.
Drawing
This set of brushes offers a range of rendering brushes for artistic drawing - a versatile mix of wet and dry mediums, they’re ideal for quick studies and life drawing.
Inking
Ideal for cleaning up artwork and drawing in ink-centric styles like sumi-e, these brushes include a variety of ink-and-brush styles, technical pens, markers, gel pens, and dry ink effects.
Painting
Encompassing a range of realistic and digital painting effects, this selection of brushes covers mediums from acrylic to stucco to oil, and offers a range of brush behaviours including the drag of an aged brush and the smear of an oil brush loaded with turpentine.
Artistic
Texture is the focus of this fascinating brush set. Brushes offer a range of effects from watery to clumpy, and build up or strip away color to reveal an underlying texture of paper or canvas.
Calligraphy
Offered in a variety of textures with particular responsiveness to pressure, these brushes all have Streamline enabled, allowing letterers to create smooth and even calligraphic forms.
Airbrushing
A staple of classic digital art, the airbrush set allows artists to lay down pure color and smooth gradients fast.
Textures
Designed to lay down large areas of texture fast, this versatile set offers both realistic textures that mimic actual drawing surfaces, and highly digital visually perfect patterns such as Victorian swirls, mathematical grids, and tessellated cubes for use in design.
Abstract
This playful set demonstrates the more unusual capabilities of Procreate’s versatile Brush Studio. With pressure-sensitive brushes that change color, grow lighter, create smoky effects, or generate chaotic shapes, this is where you can see a demonstration of the unexpected effects you can achieve with brush customization.
Charcoals
This range of realistic charcoal brushes is ideal for studies, portraits, and life drawing.
Elements
These fantastical effects brushes instantly render convincing smoke, flames, water, clouds, and more.
Spraypaints
A variety of convincing spatter and spray effects are available in this grungy and versatile brush set.
Touchups
Quickly add fine touchups like hair, stubble, noise, and several styles of skin texture to turbocharge your concept art.
Vintage
Add a range of retro textures and scattered design elements to your creations with this vintage-inspired brush set.
Luminance
This mind-blowing brush takes advantage of the power of digital art to create a range of vivid light effects from pulses to galaxies, sparkles, and bokeh.
Industrial
Designed to quickly add realistic grunge textures to your art, the Industrial set is where you’ll find concrete, metal, stone, and rust effects.
Organic
The Organic brush set offers all things natural. It includes a range of scatter brushes to quickly add grass, leaves, and bark textures to concept pieces, but also offers brushes that mimic the strokes created by handmade mediums: ink with a reed, draw with bamboo, and paint with a sable brush.
Water
This set offers several realistic watercolour brushes, along with stamp brushes for splashes, flicks, blotches and drips.
Brush Library Basics
Learn how to create your own brushes and brush sets, import sets created by others, keep your Library organized, and share your creations.

The controls to manage and organize Brush Sets are essentially the same as the controls for managing individual Brushes. Both will be explored together in this section.
Add
Create custom Brush Sets to store your modified brushes and new creations.
Drag down the list of Brush Sets to reveal a + button highlighted in blue. Tap it to add a new Brush Set at the top of the list.
The iOS Keyboard will pop up. Enter a name for your new Brush Set and hit Return or tap anywhere outside the Keyboard to commit your change.
To add a new brush, tap the + button on the top right of the Brush Library to enter the Brush Studio.
Learn more about creating brushes in the Brush Studio .
Edit
Change a wide array of settings on any existing brush.
To edit an existing brush, tap the brush to select it, then tap it again to bring up the Brush Studio.
Learn more about editing existing brushes in Brush Studio Settings .
Organize
Drag-and-drop brushes and Brush Sets to new positions in the list, or pick up multiple items to rearrange your Brush Library fast.
Tap and hold the brush or Brush Set you want to move. After a moment, it will ‘lift up’ and darken. Drag it to a new position in the list and release it.
To move multiple brushes or Brush Sets, pick up the first item as above and drag it. A green + icon will appear on it. With another finger, tap any other items you want to add to the stack. A number will appear next to the + icon counting how many items your stack holds. You can now drop the stack into a new position in the list.
To move a brush from one Brush Set to another, pick it up, hover it over the destination Brush Set, and drop it.
You can also pick up the brush you want to move, tap your destination Set with another finger to instantly switch to the new Set, then drop your brush there.
If you drag a default Procreate brush, the original will remain in place and unchanged, and a duplicate will be placed in the destination brush Set.


Duplicate
When you want to customise a default Brush Set, make your own copy for total control over the contents.
You can’t delete or rename Procreate’s default Brush Sets, or delete default brushes from within those core sets. But there is a way to create a totally customisable version of any core Procreate Brush Set.
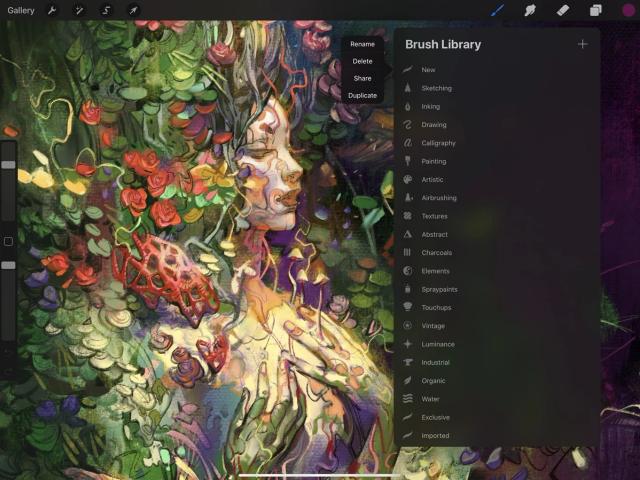
Tap on the Set you want to edit, and tap Duplicate. An exact copy of the Set will appear below the original. Copied brush sets are marked with a swoop icon, and bear the name of the original with a number. For example, the first copy you make of Vintage will be named Vintage 1.
This set is now a custom set, which means you can Rename, Delete, or Share the set, and tweak, name, delete or share your own versions of the brushes within it.
To Duplicate a brush, swipe left on it and tap Duplicate. This is a safe way to experiment with the settings on a brush while keeping the original version unchanged.
Rename
Give your custom brushes and Sets memorable names to keep your Library organized.
To change the name of a Brush Set, tap on it to select it, then tap on it again to bring up the Options menu. Tap Rename.
You can’t rename Procreate’s default Brush Sets, but you can duplicate a default Brush Set and rename the copy.
Delete
Tidy up your Brush Library by deleting unwanted duplicates and unused custom brushes.
To delete a custom Brush Set, tap it to select it, then tap it again to invoke the Options menu. Tap Delete.
To delete a custom brush, swipe left on it, and tap Delete.
You cannot delete default Procreate brushes and Brush Sets.
Share
Share your custom brushes and Brush Sets with other Procreate users.
Share an individual brush by swiping left on the brush thumbnail and tapping Share. Procreate will package your brush into a .brush file that you can share any way you like.
Share a custom Brush Set by tapping the Set to select it, tapping again to bring up Options, and tapping Share. Select a destination for your .brushset file.
プロの技
Upload your original creations to forums, share them with friends by email or AirDrop, or even sell your sets online.


Import
Download and import useful new brushes and Brush Sets into Procreate.
In the Brush Library, tap the + button to create a new brush, then tap the Import button at the top right to import a .brush or .brushset file from the Files app.
If you’ve imported a single brush, it will be placed in your current Brush Set.
An imported Brush Set will be added to the top of your Brush Library.
You can also import new brushes from outside the app. Locate a new .brush or .brushset file in Files, online, or in an email. When you tap the file, you’ll be prompted to import the new brush to Procreate.
If you import a single brush this way, your newly acquired brush will be placed in a specially created folder called Imported. Scroll to the bottom of your Brush Sets to find it.
If you import a Brush Set this way, it will appear at the top of your Brush Library.
クリップボードにコピーができませんでした。
以下のリンクをコピーしてみてください。
お探しのものが見つかりませんか?
探しているものが見つからない場合は、YouTube動画のリソースを検索するか、直接お問い合わせください。いつでも喜んでお手伝いさせていただきます。
