Procreate ハンドブック
クリップボードにコピーができませんでした。
以下のリンクをコピーしてみてください。
Interface and Basics
Master animation fast with professional motion graphics tools in a clean and simple interface.
Activate
Invoke the Animation Assist interface.

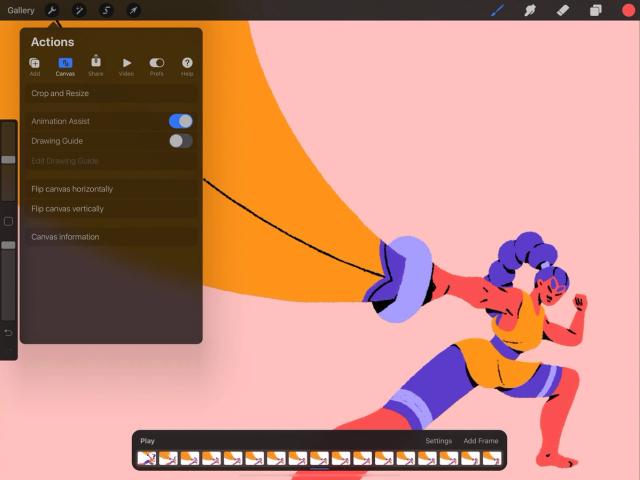
Tap the wrench button in the top left of the screen to open the Actions menu, then tap Canvas, and flip the Animation Assist toggle switch.
The Animation Assist interface is now active.
To exit the Animation Assist interface, repeat the process above.
Animation Assist Screen
Master animation fast with a visual Timeline of your frames, onion-skinning to help you track your progress, instant playback, and versatile settings.
When you invoke Animation Assist, the screen will automatically zoom to display your whole artwork, so you can see your animation.
All existing Layers in your document are now shown in Animation Assist as frames in the Timeline.
Your canvas displays your currently selected animation frame at full opacity.
When you first open Animation Assist, Onion skin frames are switched on by default.
Draw and paint on your canvas as normal. Your changes will affect the currently selected frame in your Timeline.
The Timeline represents every frame of your animation as a thumbnail.
It is similar to the Layers palette, but turned sideways. The bottom layer of your Layers panel will be the far right frame in the Timeline. This shows the frames in chronological order from left to right.
You can navigate through the Timeline in a few ways:
Tap a frame to jump to it
Drag the timeline back and forth
Flick the timeline for rapid scroll
Your currently selected frame is underlined in blue.
Live playback lets you preview your animation without interrupting your workflow.
To preview your animation, tap Play. You can stop the playback by tapping your canvas, your Timeline, or by tapping Pause.
Instantly add a blank frame to your animation.
Tap Add Frame at any time to add a blank frame next to your current frame in the Timeline.
Tap any frame to bring up frame-specific options.
The Frame Options menu gives you a variety of settings that apply to individual frames. Duplicate, Delete, or adjust the Hold Duration on a frame.
クリップボードにコピーができませんでした。
以下のリンクをコピーしてみてください。
お探しのものが見つかりませんか?
探しているものが見つからない場合は、YouTube動画のリソースを検索するか、直接お問い合わせください。いつでも喜んでお手伝いさせていただきます。
